프로그래밍/C 2013. 6. 4. 22:46

간단한 

  설명을 위해 아래와 같이 6개의 소스 파일이 있다고 하겠습니다.

  • main.c와 main.h
  • tcp.c와 tcp.h
  • rs232.c와 rs232.h

  여기서 생각해야 될 점은 main.c를 언제 컴파일하느냐 하는 것입니다. main.c 는 rs232.c의 함수와 tcp.c의 함수를 사용하기 때문에 main.c 자체가 변경되는 것 외에도 rs232.h와 tcp.h가 변할 때에도 컴파일하는 것이 안전합니다.

  • main.c 자체가 수정되었을 경우
  • main.h 가 수정되었을 경우
  • rs232.h 또는 tcp.h 가 변했을 경우

  tcp.c와 rs232.c는 자기 자신이 바뀌거나 해당 헤더파일이 변경되면 다시 컴파일이 되도록 합니다. 이제 이를 위한 간단한 Makefile을 보시겠습니다.

간단한 Makefile 만들기 

  Makefile 의 구조는 아래와 같습니다.

목표: 아래 명령을 실행하게 되는 모든 조건에 해당되는 파일 목록
    실행 명령어

  이와 같은 구조로 필요한 만큼 나열하면 됩니다. 다음은 실제 Makefile 내용입니다.

 주의

명령어 앞에는 반드시 탭 문자로 간격을 띄워야 합니다. 
공백으로 띄우시면 make 실행 시 에러가 발생합니다.

sample : main.o tcp.o rs232.o
    gcc -lm -o sample main.o tcp.o rs232.o  <-- 명령어, 즉 gcc 앞에는 tab 키로 들여 쓰기를 해야합니다. 

main.o : main.c main.h rs232.h tcp.h 
    gcc -c main.c       <-- sample 에서 링크할 것이므로 여기에서는 -c를 사용하여 컴파일만 하겠습니다. 

tcp.o : tcp.c tcp.h 
    gcc -c tcp.c

rs232.o : rs232.c rs232.h 
   gcc -c rs232.c

sample : main.o tcp.o rs232.omain.o tcp.o, rs232.o 파일 중 변경되는 파일이 있다면
아래의 명령을 실행합니다.
     gcc -lm -o sample main.o tcp.o rs232.omain.o, tcp.o, rs232.o로 실행파일 sample 를 만듭니다.
main.o : main.c main.h rs232.h tcp.h

main.c, main.h, rs232.h tcp.h 파일 중 변경되는 파일이
있다면 아래의 명령을 실행합니다.

     gcc -c main.cmain.c 를 컴파일해서 main.o를 생성합니다.
tcp.o : tcp.c tcp.htcp.c, tcp.h 파일 중 변경되는 파일이 있다면
아래의 명령을 실행합니다.
     gcc -c tcp.ctcp.c 를 컴파일해서 tcp.o를 생성합니다.
rs232.o : rs232.c rs232.hrs232.c, rs232.h 파일 중 변경되는 파일이 있다면 
아래의 명령을 실행합니다.
     gcc -c rs232.crs232.c 를 컴파일해서 rs232.o를 생성합니다.

  대충 이해가 되시나요? 뭐야 이거? 하시는 분이 계실지 모르겠습니다. 위이 예제는 아주 무식하지만 직관적으로 바로 이해되는 아주 간단한 Makefile 예제가 되겠습니다.


이제부터는 make 로 컴파일 완료

  이제 쉘에서 make 라는 명령으로 간단히 컴파일하고 실행 파일을 만들 수 있습니다.

]$ make

   편하죠? 그런데 Makefile 을 이렇게 만들면 타이핑을 해야할 것이 너무 많지요. 대부분의 프로그래머는 아주 게으릅니다. 타이핑으로 먹고 사는 사람들이 타이핑 많은 거, 좋와하지 않죠.

  이제, Makefile 만의 매크로를 이용하여 타이핑하는 횟수를 줄여 보겠습니다.


$@ $* $< $?

$@목표 이름
$*목표 이름에서 확장자가 없는 이름
$<

조건 파일 중 첫번째 파일

$?목표 파일 보다 더 최근에 갱신된 파일 이름

   자, 소개한 매크로를 이용하여 Makefile의 내용을 좀더 간단하게 만들 수 있습니다. 링크하는 부분을 먼저 보겠습니다.

sample : main.o tcp.o rs232.o
    gcc -lm -o sample main.o tcp.o rs232.o

  여기서 $@는 무엇일까요? 네, sample이 되겠습니다. 그러므로 아래와 같이 수정할 수 있습니다.

sample : main.o tcp.o rs232.o
    gcc -lm -o $@ main.o tcp.o rs232.o

  이해 되시죠. 이 번에는 $*오 $<, $? 에 대해서 말씀드리겠습니다.

tcp.o : tcp.c tcp.h 
    gcc -c tcp.c

  $*는 목표 이름에서 확장자를 제거한 이름이니까 .o를 뺀 tcp가 되겠습니다. 그러므로 $*를 이용하면 이렇게 수정할 수 있습니다

tcp.o : tcp.c tcp.h
    gcc -c $*.c

  이해 되시죠? $<는 조건에 열거된 파일 목록 중 첫번재를 의미합니다. 그러므로 $<는 조건 파일인 tcp.c tcp.h 중에서 첫번째 파일의 이름에 해당되므로 tcp.c 가 되겠습니다. 그러므로 아래와 같이 바꿀 수도 있습니다. 저 같은 경우 제일 많이 사용합니다.

tcp.o : tcp.c tcp.h 
    gcc -c $<

  $? 는 "현재 목표 파일 파일 보다 더 최근에 갱신된 파일 이름"을 나타내는 매크로입니다. 뜻은 알겠는데, 도대체 어디에 사용하는지 필요성을 잘 모르겠네요. 여하튼 예로 따져 보변 tcp.o 후에 tcp.h 가 수정되었다면 tcp.h가 된다는 것입니다.


확장자 규칙 .c.o

  일반적으로 .o 는 .c 로 만들어 지므로 실은 위의 예를 아래와 같이 명령 실행 없이 작성해도 make가 실행이 됩니다.

sample : main.o tcp.o rs232.o
    gcc -lm -o $@ main.o tcp.o rs232.o

main.o : main.c main.h rs232.h tcp.h-> 명령 실행이 없다.
tcp.o : tcp.c tcp.h-> 명령 실행이 없다.
rs232.o : rs232.c rs232.h-> 명령 실행이 없다.

  에이~ 그런데 왜 처음부터 복작하게 썼어? 하시겠지만, 이는 $*, $<, $? 를 설명 드리기 위함도 있지만 위와 같이 처리하면 컴파일은 되지만 컴파일에 대한 상세한 옵션을 처리할 수가 없습니다. 위와 같이 Makefile을 작성하고 make 를 실행하면 아마도 아래와 같이 단순한 모습으로 컴파일 될 것입니다.

]$make
cc -c -o main.o mainc
cc -c -o tcp.o tcp.c
cc -c -o rs232.o rs232.c

  요렇게 말이죠. 그러나 컴파일 할 때에는 인클루드 경로명을 지정하는 것과 같은 옵션을 사용해야 합니다. 이렇게 자동으로 진행되는 것만을 의지할 수 없습니다. 그래서 아래와 같이 .o 를 어떻게 만들어 낼지를 make 에 알려 줍니다.

sample : main.o tcp.o rs232.o
    gcc -lm -o $@ main.o tcp.o rs232.o

.c.o:
    gcc -I/home/jwjw/prjs/include -g -c $<

main.o : main.c main.h rs232.h tcp.h
tcp.o : tcp.c tcp.h
rs232.o : rs232.c rs232.h

  이제 make를 실행하면 아래와 같이 컴파일되는 모습을 보실 수 있습니다.

gcc -I/home/jwjw/prjs/include -g -c main.c
gcc -I/home/jwjw/prjs/include -g -c tcp.c
gcc -I/home/jwjw/prjs/include -g -c rs232.c
gcc -lm -o sample main.o tcp.o rs232.o

  또한 소스 파일이 Makefile과 같은 폴더 안에 있다면 아예 아래와 같이 작성하셔도 컴파일이 됩니다.

sample : main.o tcp.o rs232.o
    gcc -lm -o $@ main.o tcp.o rs232.o
.c.o:
    gcc -I/home/jwjw/prjs/include -g -c $<

  그러나 문제는 각 소스에 대한 컴파일 조건이 매우 단순해 지게 됩니다. 즉, main.c 는 main.c 자신이 수정될 때만 컴파일이 됩니다. 위의 예에서 처럼 rs232.h가 수정되거나 아예 관계가 아주 깊은 main.h 가 수정되더라도 main.c 는 재 컴파일이 안됩니다. 소스끼리 관계가 있다며 하단 부분을 서술해 주셔야 합니다.

sample : main.o tcp.o rs232.o
    gcc -lm -o $@ main.o tcp.o rs232.o
.c.o:
    gcc -I/home/jwjw/prjs/include -g -c $<

main.o: main.c main.h rs232.h
rs232.o: rs232.c rs232.h
tcp.o: tcp.c tcp.h

  그래도 많이 줄어 들었죠? 그러나 이게 다가 아닙니다.


매크로로 치환

  예제의 main.o tcp.o rs232.o 의 파일 이름이 2번 중복되어 있습니다. 두번 타이핑을 해야 하는데, 앞서 말씀드렸듯이 프로그래머는 게으릅니다. 2번~? 귀찮습니다. 아래와 같이 수정해 봅시다.

OBJS = main.o tcp.o rs232.o

sample : $(OBJS)
    gcc -lm -o $@ $(OBJS)
.c.o:
    gcc -I/home/jwjw/prjs/include -g -c $<

 또는 $^ 를 이용하여 아래와 같이 수정할 수 도 있습니다. $^는 조건에 있는 모든 파일 이름을 대신하는 매크로입니다.

OBJS = main.o tcp.o rs232.o

sample : $(OBJS)
    gcc -lm -o $@ $^
.c.o:
    gcc -I/home/jwjw/prjs/include -g -c $<

 하는 김에 컴파일 옵션과 링크 옵션도 매크로로 치환해 보겠습니다.


OBJS = main.o tcp.o rs232.o
CC = -I/home/jwjw/prjs/include -g -c

sample : $(OBJS)
    gcc -lm -o $@ $^
.c.o:
    gcc $(CC) $<

 이렇게 매크로로 치환하여 Makefile 의 윗 행에 모아 두면, 내용 전체를 볼 필요 없이 매크로 부분만 보거나 수정해도 되기 때문에 편리합니다. 이래서 아래와 같이 수정하여 완성할 수 있습니다.

TARGET = sample
OBJS = main.o tcp.o rs232.o
CC = -I/home/jwjw/prjs/include -g -c

$(TARGET : $(OBJS)
    gcc -lm -o $@ $^
.c.o:
    gcc $(CC) $<

main.o: main.c main.h rs232.h
rs232.o: rs232.c rs232.h
tcp.o: tcp.c tcp.h

gccmakedep

  다른 것들은 모두 편리하고 좋은 것 같은데, Makefile 하단에 있는 파일 간의 종속에 대한 정보를 모두 타이핑해서 넣어야 할까요? 파일이 많을 경우 어떻게 일일이 입력할 수 있있겠습니까?  당연한 말씀입니다. 게으른 프로그래머에게는 말도 안되죠. 그래서 이와 같은 귀찮은 작업을 make에 떠 넘기겠습니다. 바로 파일간의 의존성을 찾아서 그 내용을 직접 구성해 달라고 요청하는 것이죠.

  이렇게 파일의 의존성을 검색해서 그 내용을 작성해 주는 것이 gccmakedep 입니다. 아래와 같이 수정해서 make dep를 실행합니다.

TARGET = sample
OBJS = main.o tcp.o rs232.o
SRCS = $(OBJS:.o=.c)
CC = -I/home/jwjw/prjs/include -g -c

$(TARGET): $(OBJS)
    gcc -lm -o $@ $^

.c.o:
    gcc $(CC) $<

dep : 
    gccmakedep $(SRCS)

  이렇게 추가 작성해서 make dep 를 실행하시면 make는 컴파일과 링크 작업 대신에 라벨 dep: 밑의 명령을 실행합니다. 새로 만들어진 SRCS는 OBJS에 열거된 파일 모록에 대해서 확장자를 .o를 .c로 바뀐 목록을 가지게 됩니다. gccmakedep는 소스 파일을 가지고 의존성을 검색할 수 있기 때문이죠.

]$ make dep
]$ vi Makefile

TARGET = sample 
OBJS = main.o tcp.o rs232.o 
SRCS = $(OBJS:.o=.c) 
CC = -I/home/jwjw/prjs/include -g -c 
    $(TARGET): $(OBJS) gcc -lm -o $@ $^ 
.c.o: 
    gcc $(CC) $< 
dep : gccmakedep $(SRCS)

# DO NOT DELETE
main.o: main.c /usr/include/stdio.h .........
tcp.o: tcp.c 
/usr/include/stdio.h .........
rs232.o: rs232.c /usr/include/stdio.h .........

  하단에# DO NOT DELETE 행과 함께 밑으로 각 .o 에 대한 관련 파일 목록이 자동으로 생성되는 것을 보실 수 있습니다. 이제 make를 실행하면 위 정보에 맞추어 컴파일하게 됩니다.

//
프로그래밍/C 2013. 5. 22. 06:28

TCP/IP 통신 함수 사용 순서

TCP/IP 예제 소개

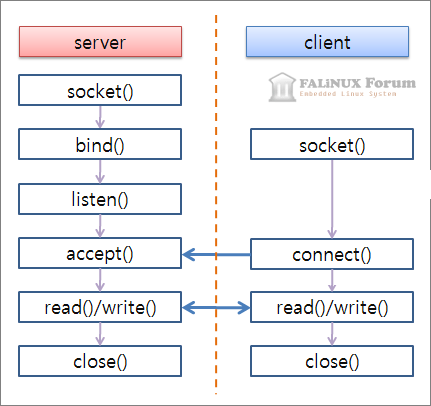
  TCP/IP 예제를 서버와 클라이언트로 나누어서 설명을 드리도록 하겠습니다.

  1. 서버와 클라이언트는 port 4000번을 사용
  2. 클라이언트프로그램에서 서버에 접속하면 실행할 때 입력받은 문자열을 전송
  3. 서버는 클라이언트로부터 자료를 수신하면 문자열 길이와 함께 수신한 문자열을 클라이언트로 전송

서버 프로그램

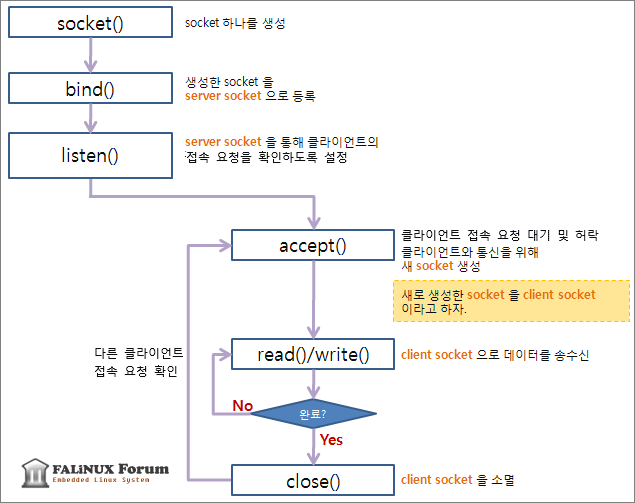
  서버 프로그램에서 사용해야할 함수와 순서는 아래와 같습니다.

  우선 socket 부터 만들어야 합니다. TCP/IP에서는 SOCK_STREAM을 UDP/IP에서는 SOCK_DGRAM을 사용하는 것을 참고하여 주십시오. socket()에 대한 더 자세한 말씀은 "Unix C Reference의 11장 7절 소켓 열고 닫기"를 참고하십시오.

int     server_socket;

server_socket = socket( PF_INET, SOCK_STREAM, 0); 
if (-1 == server_socket)
{
   printf( "server socket 생성 실패"); 
   exit( 1) ;
}

  bind() 함수를 이용하여 socket에 server socket 에 필요한 정보를 할당하고 커널에 등록

  1. 만들어진 server_socket 은 단지 socket 디스크립터일 뿐입니다.
  2. 이 socket에 주소를 할당하고 port 번호를 할당해서 커널에 등록해야 합니다.
  3. 커널에 등록해야 다른 시스템과 통신할 수 있는 상태가 됩니다.
  4. 더 정확히 말씀드린다면 커널이 socket 을 이용하여 외부로부터의 자료를 수신할 수 있게 됩니다.
  5. socket에 주소와 port 를 할당하기 위해 sockaddr_in 구조체를 이용합니다.
  6. struct sockaddr_in server_addr;

    memset( &server_addr, 0, sizeof( server_addr);
    server_addr.sin_family      = PF_INET;              // IPv4 인터넷 프로토롤 
    server_addr.sin_port        = htons( 4000);         // 사용할 port 번호는 4000
    server_addr.sin_addr.s_addr = htonl( INADDR_ANY);   // 32bit IPV4 주소

    if( -1 == bindserver_socket, (struct sockaddr*)&server_addr, sizeof( server_addr) ) )
    {
       printf( "bind() 실행 에러n");
       exit( 1);
    }

  7. htonlINADDR_ANY) 는 주소를 지정해 주는 것으로 inet_addr( "내 시스템의 IP ")로도 지정할 수 있습니다. 그러나 프로그램이 실행되는 시스템 마다 IP 가 다를 것이므로 주소 지정을 고정 IP로 하지 않고 htonlINADDR_ANY) 를 사용하는 것이 편리합니다.

  이제 listen() 함수로 클라이언트 접속 요청을 확인합니다. 

if( -1 == listen( server_socket, 5))
{
    printf( "대기상태 모드 설정 실패n");
    exit( 1);
}

  1. listen() 함수를 호출하면 클라이언트의 접속 요청이 올 때 까지 대기 상태가 됩니다. 즉, 블록된 모습이 되죠.
  2. 함수가 리턴이 되었을 때에는 클라이언트의 접속이 요청 되었다든지, 아니면 에러가 발생했을 경우입니다.
  3. 에러 없이 함수가 복귀했다면 클라이언트의 접속 요청입니다.
  4. 접속 요청을 허락합니다. 

  클라이언트 접속 요청에 따라 accept()로 접속을 허락합니다. 

  1. accept()로 접속 요청을 허락하게 되면 클라이언트와 통신을 하기 위해서 커널이 자동으로 소켓을 생성합니다.
  2. 이 소켓을 client socket이라고 하겠습니다.
  3. client socket 정보를 구하기 위해 변수를 선언합니다.  그리고 client 주소 크기를 대입합니다. 
  4. int     client_addr_size;

    client_addr_size = sizeof( client_addr);

  5. accept()를 호출 후에 에러가 없으면 커널이 생성한 client socket 을 반환해 줍니다.
  6. client_socket = accept( server_socket, (struct sockaddr*)&client_addr,
                                                              &client_addr_size);

    if ( -1 == client_socket)
    {
       printf( "클라이언트 연결 수락 실패n");
       exit( 1);
    }

  이제 client socket까지 만들어 졌으므로 read(), write() 함수를 이용하여 자료를 송수신 할 수 있습니다. read() 함수를 이용하여 클라이언트로부터 전송되어 오는 자료를 읽어 들입니다.

read ( client_socketbuff_rcv, BUFF_SIZE);

  1. read() 를 이용하여 클라이언트로부터 전송된 자료를 읽어 들입니다.
  2. 만일 클라이언트로부터 전송된 자료가 없다면 송신할 때 까지 대기하게 됩니다. 즉, 블록된 모습이 됩니다.
  이번에는 wirte() 함수를 이용하여 클라이언트도 데이터를 전송합니다. 

  1. 수신된 데이터의 길이를 구하여 전송 데이터를 준비합니다.
  2. sprintf( buff_snd, "%d : %s", strlen( buff_rcv), buff_rcv);

  3. write() 를 이용하여 클라이언트로 자료를 송신합니다.

    write( client_socketbuff_snd, strlen( buff_snd)+1); // +1: NULL까지 포함해서 전송

  작업이 완료되면 close() 를 이용하여 client socket 을 소멸 시켜 데이터 통신을 종료합니다.

closeclient_socket);

클라이언트 프로그램

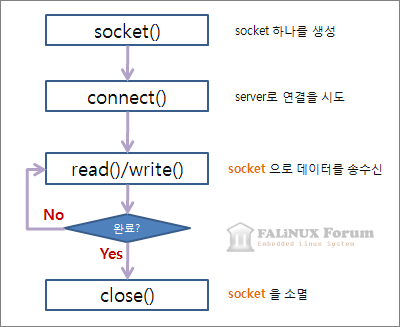
  클라이언트 프로그램은 서버에 비해 간단합니다. 바로 설명 들어갑니다.

  socket() 을 이용하여 소켓을 먼저 생성합니다.

int     client_socket;

client_socket = socket( PF_INET, SOCK_STREAM, 0);
if( -1 == client_socket)
{
   printf( "socket 생성 실패n");
   exit( 1);
}

  connect()를 이용하여 서버로 접속을 시도합니다. 

  1. 주소 정보에 서버의 주소와 포트번호를 지정하고
  2. 서버와의 연결을 시도합니다.
  3. 예제에서는 시스템 자기를 가르키는 IP, 127.0.0.1 을 사용했습니다.
  4. struct sockaddr_in    server_addr;

    memset( &server_addr, 0, sizeof( server_addr));
    server_addr.sin_family = AF_INET;
    server_addr.sin_port = htons( 4000);
    server_addr.sin_addr.s_addr= inet_addr( "127.0.0.1");  // 서버의 주소

    if( -1 == connect( client_socket, (struct sockaddr*)&server_addr, sizeof( server_addr) ) )
    {
       printf( "접속 실패n");
       exit( 1);
    }

  1. 접속에 성공하면 데이터를 전송합니다.
  2. writeclient_socket, argv[1], strlen( argv[1])+1); // +1: NULL까지 포함해서 전송

  3. 자료를 수신하고 화면에 출력합니다.
  4. read ( client_socket, buff, BUFF_SIZE);
    printf( "%sn", buff);

  5. socket 을 소멸하여 통신 작업을 완료합니다.
  6. closeclient_socket);

서버 프로그램 소스

#include <stdio.h>
#include <stdlib.h>
#include <string.h>
#include <unistd.h>
#include <arpa/inet.h>
#include <sys/types.h>
#include <sys/socket.h>

#define  BUFF_SIZE   1024

int   main( void)
{
   int   server_socket;
   int   client_socket;
   int   client_addr_size;

   struct sockaddr_in   server_addr;
   struct sockaddr_in   client_addr;

   char   buff_rcv[BUFF_SIZE+5];
   char   buff_snd[BUFF_SIZE+5];


   server_socket  = socket( PF_INET, SOCK_STREAM, 0);
   if( -1 == server_socket)
   {
      printf( "server socket 생성 실패n");
      exit( 1);
   }

   memset( &server_addr, 0, sizeof( server_addr));
   server_addr.sin_family     = AF_INET;
   server_addr.sin_port       = htons( 4000);
   server_addr.sin_addr.s_addr= htonl( INADDR_ANY);

   if( -1 == bind( server_socket, (struct sockaddr*)&server_addr, sizeof( server_addr) ) )
   {
      printf( "bind() 실행 에러n");
      exit( 1);
   }

   while( 1)
   {
      if( -1 == listen(server_socket, 5))
      {
         printf( "대기상태 모드 설정 실패n");
         exit( 1);
      }

      client_addr_size  = sizeof( client_addr);
      client_socket     = accept( server_socket, (struct sockaddr*)&client_addr, &client_addr_size);

      if ( -1 == client_socket)
      {
         printf( "클라이언트 연결 수락 실패n");
         exit( 1);
      }

      read ( client_socket, buff_rcv, BUFF_SIZE);
      printf( "receive: %sn", buff_rcv);
      
      sprintf( buff_snd, "%d : %s", strlen( buff_rcv), buff_rcv);
      write( client_socket, buff_snd, strlen( buff_snd)+1);          // +1: NULL까지 포함해서 전송
      close( client_socket);
   }
}

클라이언트 프로그램 소스

#include <stdio.h>
#include <stdlib.h>
#include <string.h>
#include <unistd.h>
#include <arpa/inet.h>
#include <sys/types.h>
#include <sys/socket.h>

#include "sample.h"

#define  BUFF_SIZE   1024

int   main( int argc, char **argv)
{
   int   client_socket;

   struct sockaddr_in   server_addr;

   char   buff[BUFF_SIZE+5];

   client_socket  = socket( PF_INET, SOCK_STREAM, 0);
   if( -1 == client_socket)
   {
      printf( "socket 생성 실패n");
      exit( 1);
   }

   memset( &server_addr, 0, sizeof( server_addr));
   server_addr.sin_family     = AF_INET;
   server_addr.sin_port       = htons( 4000);
   server_addr.sin_addr.s_addr= inet_addr( "127.0.0.1");

   if( -1 == connect( client_socket, (struct sockaddr*)&server_addr, sizeof( server_addr) ) )
   {
      printf( "접속 실패n");
      exit( 1);
   }
   write( client_socket, argv[1], strlen( argv[1])+1);      // +1: NULL까지 포함해서 전송
   read ( client_socket, buff, BUFF_SIZE);
   printf( "%sn", buff);
   close( client_socket);
   
   return 0;
}

//
프로그래밍/C 2013. 4. 20. 20:54

scanf 함수의 개념은 "입력 버퍼(stdin)에서 format에서 지정한 대로 읽어들
인다" 입니다. 위의 두개의 차이는 다음과 같습니다.

"%d %d" - stdin에서 숫자, 1자 이상의 공백문자(white-space character), 숫
자를 읽어들인다.
"%d %d\n" - stdin에서 숫자, 1자 이상의 공백문자, 숫자, 1자 이상의 공백문
자를 읽어들인다.

C99의 FCD인 N869 문서의 7.19.6.2.5절을 인용하겠습니다.

A directive composed of white-space character(s) is executed by reading
input up to the first non-white-space character (which remains unread),
or until no more characters can be read.

형식(format) 문자열에 있는 공백문자(white-space)는 그 다음에 공백 문자가
아닌 문자(non-white-space)가 올때까지 입력버퍼(stdin)에서 읽어들이라는
뜻입니다. 즉, "%d %d\n"는 숫자 2개, 1자 이상의 공백문자, 공백문자가 아닌
문자를 받아야만 입력이 완전하게 끝나는 것입니다. 참고로 "%d %d\n"과 "%d
%d ", "%d %d\t"는 같은 뜻을 가집니다.

말이 어렵게 되어버렸는데, 예제로 설명하겠습니다.

scanf("%d %d", &a, &b);
숫자값, 1자 이상의 공백문자, 숫자값이 입력버퍼에 있기를 기대한다.
숫자값, 1자 이상의 공백문자, 숫자값까지 읽어들인다. 그 나머지는 입력 버
퍼(stdin)에 그대로 놔둔다.

실행 결과 - 1 2를 입력했을 경우 형식(format) 문자열과 완벽히 일치한다.
그러므로 a와 b에 읽어들인 값을 저장하고 함수(scanf)를 종료한다.

scanf(%d %d\n", &a, &b);
숫자값, 1자 이상의 공백문자, 숫자값, 1자 이상의 공백문자, 공백문자가 아
닌 문자가 입력버퍼에 있기를 기대한다.
숫자값, 1자 이상의 공백문자, 숫자값, 1자 이상의 공백문자까지 읽어들인다.
그 나머지는 입력 버퍼(stdin)에 그대로 놔둔다.

실행 결과 - 1 2를 입력했을 경우 "%d %d"까지 일치가 되지만 \n 문자 때문에
1자 이상의 공백문자와 그 뒤에 공백문자가 아닌 문자를 기다리게 됩니다. 여
기에 3을 또 입력하게 되면 공백문자까지 읽어들이게 되고 나머지(3)는 그대
로 입력버퍼에 남게 됩니다. 이 남아있는 3은 다음 scanf문이 실행될 때 영향
을 주게 됩니다.

그리고 한가지 더. 다음의 예제 코드를 봐 주십시오.

#include <stdio.h>

int main(void)
{
    int a, b;

    printf("\n>>");


    scanf("%d %d\n", &a, &b);
    printf("[%d,%d]\n>>", a, b);

    scanf("%d %d\n", &a, &b);
    printf("[%d,%d]\n>>", a, b);

    return 0;
}

이 프로그램의 실행 결과는 다음과 같습니다.

$ gcc 3.c -o 3
plsj@localhost: ~
$ ./3

>>1 2    <- 1과 2를 입력한다.
3    <- 숫자 2개가 입력되었는데도 입력을 기다린다. 3을 입력한다.
[1,2]    <- 입력된 숫자 출력
>>4 5    <- 숫자 2개를 또 입력
[3,4]    <- 4 5를 출력하는게 아니라 3과 4를 출력한다.
>>plsj@localhost: ~
$ ./3

>>1 2    <- 1과 2를 입력한다.
a    <- 숫자 2개가 입력되었는데도 입력을 기다린다. 3을 입력한다.
[1,2]    <- 입력받은 값을 출력한다.
>>[1,2]    <- 여기에서 입력을 한번 받아야되는데 받지 않고 입력받은 값을

              또한번 출력한다.
>>plsj@localhost: ~
$


첫번째 실행에서 1 2가 입력되면, "%d %d\n" 중에서 "%d %d"까지 일치가 됩니
다. 그러나 \n이 남아있기 때문에 1자 이상의 공백문자와 공백문자가 아닌 문
자의 입력을 기다리게 됩니다. 여기에 3을 입력하면 3 이전의 공백문자까지
읽어들이게 되어 첫번째 scanf 함수가 끝나게 되고 3은 입력버퍼에 그대로 남
습니다. 그다음의 scanf 함수가 실행되면 입력버퍼에 있는 3을 읽어들이게 되
고 " %d\n"이 남게 됩니다. 여기에 4 5를 입력하게되면 "4 "까지 읽어들이게
되고 5는 그대로 입력버퍼에 남게 됩니다. 즉 a에는 3이, b에는 4가 입력되는
것이죠.

두번째 실행에서도 마찬가지 입니다. 다만 첫번째 scanf 함수가 끝난 후에 3
대신 a가 입력버퍼에 남게 되고, 두번째 scanf 함수가 실행되면 형식(format)
문자열의 %d가 a와 일치가 안되기 때문에 두번째 scanf 함수는 하는일 없이
그대로 끝나게 됩니다. 따라서 1 2가 두번 출력되게 됩니다.

//
프로그래밍/C 2013. 4. 19. 00:26

1. stack memory(스택메모리)

stack 이란 단어를 컴퓨터 사전에서 찾아보면 이렇게 정의되어 있습니다.

“후입선출(LIFO, Last-In, First Out)방식에 의하여 정보를 관리하는 자료구조. 스택에서는 톱(Top)이라고 불리우는 스택의 끝부분에서 자료의 삽입과 삭제가 발생한다. 즉, 스택에 자료를 삽입하게 되면 톱 위치에 삽입된 정보가 위치하게 된다. 그리고 스택에서 정보를 읽어오려 하면 스택의 톱 위치에 있는 정보가 반환된다. 따라서 스택에서는 가장 나중에 삽입된 정보가 가장 먼저 읽혀지는 특징을 가지고 있다.”

그림으로 설명하자면 밑의 그림과 같습니다. A→B→C→D 라는 순서대로 자료가 쌓이게 됩니다. 그리고 빠져 나올 때는 위에서부터 차례대로 D→C→B→A 빠져나오게 됩니다. 이러한 구조를 stack 구조라고 합니다.


  |  |     |  |     |  |     |  |     |  |     |  |      
  |__|     |__|     |__|     |__|     |  |     |  |    

  |  |     |  |     |  |     |D |     |  |     |  |        

  |__|     |__|     |__|     |__|     |__|     |  |        

  |  |     |  |     |C |     |C |     |C |     |  |        

  |__|     |__|     |__|     |__|     |__|     |__|      

  |  |     |B |     |B |     |B |     |B |     |B |        

  |__|     |__|     |__|     |__|     |__|     |__|      

  |A |     |A |     |A |     |A |     |A |     |A |      

  |__|     |__|     |__|     |__|     |__|     |__|


이러한 스택구조가 실생활에서 쓰이는 예로는 택시에서 볼 수 있는 동전을 넣는 원형통입니다. 동전은 원통형의 공간에 들어가고, 원통 아래쪽엔 스프링이 달려서 동전을 밀어 내줍니다. 손님에게 동전을 거슬러 줄 때 위에서부터 동전이 하나씩 나오게 되죠. 그럼 버스에서 보게 되는 동전교환기도 스택일까요? 이것은 스택이 아니라 큐라는 구조 입니다. 원통에 동전이 차곡차곡 쌓여있고, 아래쪽 동전부터 빠져나오게 됩니다.

즉 여기서 동전을 처음에 넣는 것을 push 라는 단어를 사용하게 됩니다.

    push : 하나의 데이터를 스택에 추가한다.

그리고 동전을 꺼내는 것을 pop 이라고 합니다

    pop : 하나의 데이터를 스택에서 꺼낸다.

보통 스택구조를 LIFO 라고 합니다. 즉 Last In First Out 입니다. 말 그대로 마지막에 저장한 데이터는 처음 얻어진다는 뜻입니다. 처음 집어넣은 데이터는 제일 마지막에 얻어지게 되겠지요. 이러한 방식이 컴퓨터에서는 메모리 영역 한 부분이 이런 식으로 동작하고 그 메모리 영역을 스택이라고 부르는 것입니다. 스택을 생각해 내지 못했다면 많은 변수의 사용이나, 함수 호출은 할 수가 없었을 것입니다. 그리고 스택은 프로세스가 생성될 때 필요한 만큼이 할당되어 집니다. 즉 고정사이즈 입니다. 스택 오버플로우라던가, 스택 언더플로우는 스택이 고정사이즈이기 때문에 발생하는 에러입니다.

위에서 프로세스 생성시에 스택은 정적으로 프로세스 공간에 할당 된다고 하였습니다. 그리고 스택은 내부에서도 할당과 반환이 이루어 집니다. 예를들어 스택공간이 1000byte라고 한다면 이 스택의 상대적인 주소값은 0~999까지 갖을 수 있습니다. 이 비어있는 스택에 1바이트 값을 하나 넣어주면 1바이트가 할당되는 것이라고 할 수 있습니다. 1바이트 값을 하나 스택에서 빼오는 것은 스택에서 1바이트를 반환하는 것으로 생각 할 수 있습니다. 이런 스택의 할당과 반환을 처리하기 위해서 CPU에서는 “스택 포인터”라는 레지스터가 있습니다. 이 스택포인터란 것으로 스택이 작동하며 위에서는 1byte 넣고 빼고 하는 예를 들었는데 스택 포인터를 조작하여 스택 내부에 가변적인 크기를 할당해 놓을 수도 있습니다.

그럼 일반적으로 스택이 사용되는 예를 알아보도록 하겠습니다.

스택이라는 메모리 공간에는 우리가 변수로 잡아준 것들이 위에서 설명한 방식으로 할당되고 반환됩니다. 외부 정적 변수를 제외하고 보통 자동변수라고 함수 내에서 선언하는 변수들은 스택 내부에 확보됩니다. 그리고 고정되게 위치하는 것이 아니고 동적으로 스택에 확보가 됩니다.

int ABC;

위의 ABC 변수는 4바이트가 스택에 확보되고 그 스택메모리가 변수로 사용됩니다. 블록이 닫히는 지점에서 스택 포인터 값이 변경되며 확보되어있던 부분이 소멸되지요.

배열변수도 마찬가지 입니다.

void func(void)

{

   char DEF[10];

}

프로그램이 func() 로 실행될때 스택에 10바이트를 할당하고 그 할당된 스택 메모리가 변수를 담는 공간으로 이용됩니다. 물론 10바이트만 할당 되는 것은 아닙니다. 함수호출 자체가 스택을 사용하기 때문에 기본적으로 확보되어야 할 스택에다가 덤으로 10바이트를 할당합니다.

변수가 항상 스택에 할당 되는 것은 아닙니다. 하지만 대체로 스택에 할당 됩니다.

또한 포인터 변수에서도 사용이 됩니다. 포인터 변수라고 특별난 것은 없고 그냥 일반 변수처럼 포인터 변수 또한 스택이라는 공간에 잡힙니다. 단지 포인터 변수는 그 변수에 담겨있는 값이 메모리 주소값 이라는 것뿐입니다. 포인터 변수는 그냥 일반 변수와 똑같고, 사이즈는 언제나 32비트입니다. 안에 담겨있는 값이 단지 주소라는 것 뿐입니다. 변수 자체는 일반변수처럼 스택에 할당됩니다. 단지 C 라는 컴파일러에서 포인터 변수라는 의미를 부여하는 것입니다.

또한 함수 호출 후 복귀 할 때도 사용이 됩니다. 함수를 호출하기 직전에 프로그램 카운터 값을 스택에 한번 넣어주고 호출하게 됩니다. 그 호출된 함수고 종료되어 리턴되면 CPU는 스택에서 최근 넣어진 프로그램 카운터 값을 빼오고 현재의 프로그램 카운터를 빼온 값으로 변경하여 실행하게 됩니다. 그럼 프로그램은 함수 호출 후에 다시 원래대로 카운트 증가해 나가면서 실행되는 것입니다. 이것이 함수 호출의 원리이고, 스택메모리가 사용되는 예입니다.

여기서 주의할 점은 스택에 생성된 메모리는 선언된 함수나 블록문이 끝나면 자동해제됩니다.


2. heap memory(힙메모리)

heap memory 는 컴퓨터 사전을 찾아보면 이렇게 정의되어 있습니다.

“ 프로그램의 실행 도중에 요구되는 기억 장소를 할당하기 위하여 운영 체제에 예약되어 있는 기억 장소 영역. 프로그램에서 실행 도중에 자료를 저장하기 위하여 기억 장소를 요청하게 되면 운영 체제에서는 힙에 존재하는 기억 장소를 프로그램에 할당한다. 그리고 프로그램에서 기억 장치를 더 이상 필요로 하지 않는 경우에는 앞에서 할당 받았던 기억 장소를 운영체제에 반납하게 되는데, 이때 운영체제에서는 반납된 기억 장소를 다시 힙에 연결하게 된다. 힙에 대한 기억 장소는 포인터를 통해 동적으로 할당되거나 반환이 되는데 연결 리스트, 트리, 그래프 등과 같이 동적인 특성을 가지고 있는 자료구조에서 널리 사용된다.”

힙은 프로그램이 실행될 때까지 알 수 없는 가변적인 양만큼의 데이터를 저장하기 위해 프로그램의 프로세스가 사용할 수 있도록 미리 예약되어 있는 메인 메모리의 영역입니다. 예를들면 하나의 프로그램은 처리를 위해 한명 이상의 사용자로부터 서로 다른 양의 입력을 받을 수 있으며 즉시 모든 입력데이터에 대해 처리를 시작합니다. 운영체계로부터 이미 확보된 일정량의 힙 저장공간을 가지고 있으면 저장과 관련된 처리를 좀 더 쉽게 할 수 있으며 일반적으로 필요할 때마다 운영체계의 운영체계에게 매번 저장공간을 요청하는 것보다 빠르게 됩니다. 프로세스는 필요할 때 heap 블록을 요구하고 더 이상 필요 없을 때 반환하며 이따금씩 자투리 모으기를 수행함으로써 자신에게 할당된 heap을 관리하기도 합니다. 여기서 자투리 모으기란 더 이상 사용되지 않는 블록들을 사용 가능한 상태로 만들고 또한 heap 내의 사용 가능한 공간을 인지함으로써 사용되지 않은 작은 조각들이 낭비되지 않도록 하는 것을 말합니다.

힙이란 컴퓨터의 기억 장소에서 그 일부분이 프로그램들에 할당되었다가 회수되는 작용이 되풀이 되는 영역입니다. 스택영역은 엄격하게 후입선출(LIFO)방식으로 운영되는데 비해 힙은 프로그램들이 요구하는 블록의 크기나 요구/횟수 순서가 일정한 규칙이 없다는 점이 다릅니다. 대개 힙의 기억장소는 포인터변수를 통해 동적으로 할당받고 돌려줍니다. 이는 연결 목록이나 나무, 그래프 등의 동적인 자료 구조를 만드는데 꼭 필요한 것입니다.

그럼 힙 메모리를 프로그램을 사용할 수 있는 자유메모리라고 할 수 있습니다. 프로그램 실행 시에 함수로 내는 데이터 등을 일시적으로 보관해 두는 소량의 메모리와 필요시 언제나 사용할 수 있는 대량의 메모리가 있습니다. 이때, 소량의 메모리를 ‘스택’이라 하고 대량의 메모리를 ‘힙’ 이라고 합니다. 이 ‘힙’이 없어지면 메모리 부족으로 ‘이상종료’를 하게 됩니다.

프로세스에 exe 이미지가 로드되고, 할당되고, 이것저것 필요한 동적 라이브러리가 로드되고 사용되지 않는 미사용 구간이 있는 것은 분명한데 그 미사용 영역이 ‘힙’이라고 합니다. 프로그램을 짤 때 new나 malloc()함수를 이용한 동적 할당을 하게 되면 힙 영역이 사용 가능하도록 되는 것입니다. 님께서 물어보신 생성자, 소멸자 역시 힙 영역에 메모리를 할당하고 해제하는것입니다. 필요한 메모리 사이즈만큼 OS에게 할당해 달라고 부탁할 수도 있으며, 사용을 다 했으면 다시 OS에게 넘겨줘야 합니다.

예를들어 

   char *p = new char[1000];

위와 같은 코드가 런타임시 힙영역에 메모리를 1000바이트 할당하는 동작을 합니다. 물론 할당을 하였으면 반환도 해주어야 겠지요. 참고로 힙을 마구 할당하고 반환시키다가 보면 선형 메모리의 중간중간이 끊어지게 됩니다. 즉 다른말로 표현하자면 메모리 블록이 여러조각으로 나뉘게 되어 비효율적으로 되어버리기도 합니다.

힙 메모리는 프로그램이 종료 될 때까지 관리하고 유지 되는 메모리 영역이기 때문에 전역함수를 쓰지 않고 프로그램 내에서 지속적으로 메모리를 참조해야 할 경우 힙 영역에 메모리를 할당 받으면 됩니다.

//
프로그래밍/C 2013. 4. 19. 00:19

빨강 검정 나무.. ??


 학부생때 '레드 블랙 트리'를 보통 자료구조 시간에 들어보셨을 수도 있지만 못 들으신 분들은 이게 뭔 트리인지 하실겁니다. '이진트리', 'AVL트리'까지는 들어봤는데 말이죠. 혹시 레드(red)고 블랙(black)이니 빨갛고 까만 열매를 가진 트리인가라고 생각하신 분들은 통찰력이 뛰어난 분들입니다. 우리가 다룰 레드 블랙 트리도 진짜로 비슷하게 생겼거든요. '레드 블랙 트리'를 알기 위해서는 기본적으로 '이진트리'에 대해 알고 있어야 합니다. '이진트리'는 '이진탐색트리'라고도 부르는데 생겨난 목적이 탐색을 위해 태어난 녀석이기 때문이라죠. 사실 빠른 탐색만을 위해서 존재한다면 해쉬(hash) 자료구조를 따라갈 녀석이 없겠지만, 해쉬(hash) 자료구조는 용량을 팔아 속도를 얻는 녀석이기 때문에 효율성면에서는 이진트리보다는 경쟁력이 떨어집니다. 그렇기 때문에 용량도 적당히 사용하고 비교적 탐색속도도 빠른 이진탐색을 사용하는 것이죠. 그렇다면 왜 이진탐색이 빠른걸까요? 바로 아래와 같이 생겨먹었기 때문입니다.


'이진트리'는 보시는 바와 같이 루트 노드부터 검색을 시작하게 되는데 자식은 꼭 두명이여야만 하고, 자신보다 작은 값을 왼쪽 노드에 두고 큰 값을 오른쪽 노드에 두는 규칙을 가지고 있습니다. 때문에 탐색시 모든 노드를 고려할 필요가 없습니다. 예를 들어 위의 '이진트리'에서 11을 찾는다고 치면 단 두번의 비교로 11을 찾을 수가 있다는 거죠. 와우~! 하지만 이렇게나 괜찮은 '이진탐색트리'에도 치명적인 단점이 고려했으니 바로 아래와 같은 경우는 해결하지 못 한다는 점이었습니다. 쿠궁....


위와 같이 값이 한쪽으로 쏠리게 들어왔을 경우에 가장 아래에 있는 값을 검색하기 위해서는 결국 모든 경우를 고려해야 한다는 겁니다. 이건 일반적인 순차검색과 다를바가 없죠. 즉 균형잡힌 경우에는 O(logN)의 속도를 보장하지만 위와 같이 쏠린 경우에는 O(N)의 성능밖에 못 내는 것입니다. 이렇듯 최악의 조건까지 고려해야지만 훌륭한 알고리즘이라고 할 수 있습니다. 이게 바로 '균형이진트리' 의 탄생비화(?) 입니다.


'균형이진트리'의 종류로는 AVL트리, 2-3-4트리, 레드 블랙 트리등이 있습니다. AVL트리는 균형이진트리의 초기모델로서 최악의 조건에서 성능적으로 레드 블랙 트리보다 후달리기에 지금 시점에서는 레드 블랙 트리가 대중적으로 사용되고 있습니다. 둘다 성능은 O(logN)이며 최악의 조건에서도 O(logN)을 보장하고 있습니다. 대단하지 않나요?ㅎㅎㅎ


일단 커널코드를 보기 전에 이렇게나 대단한 레드 블랙 트리가 어떠한 원리로 움직이는지에 대해 개념적으로 짚고 넘어가도록 하겠습니다. 뭐든지 기본이 중요한 법이니깐요. ^^ 우선 레드 블랙 트리의 모양새는 아래와 같습니다.


 레드 블랙 트리를 처음 보시는 분이라면 이름 한번 잘 지었다고 생각들겁니다. 정말로 트리가 알록달록 빨강 까망이니깐요 ㅎㅎㅎ 하지만 심심한 트리에다 멋 부린다고 이렇게 꾸민 것이 아닙니다. 알록달록한 빨갛고 검은색의 컬러가 사실 트리의 균형을 맞추는 열쇠입니다. 그 비결은 예제를 통해서 알아보도록 하겠습니다. 우선 예제를 보기 위해 레드 블랙 트리의 규칙을 알려드리겠습니다.


1. 모든 노드는 빨강 아니면 검정이다.

2. 루트 노드는 검정이다.

3. 모든 잎 노드는 검정이다.

4. 빨간 노드의 자식들은 모두 검정이다. 하지만 검정노드의 자식이 빨강일 필요가 없다.

5. 루트 노드에서 모든 잎 노드 사이에 있는 검은 색 노드의 수는 모두 동일하다.


이렇게 총 5가지의 규칙이 있는데 규칙은 아래에서 위로 올라갈수록 우선순위가 높아집니다. 즉 4번보다는 2번이 더 우선순위가 높은 것이죠. 이를 명심하시구 예제를 보시도록 하겠습니다.


① 우선 첫번째 '1'이 삽입되었습니다. 첫번째 노드 이므로 당연히 루트가 됩니다. 새 노드의 초기값은 빨강이지만 2번 규칙에 따르려면 루트 노드는 검정색이어야 하는 군요. 그럼 일단 새 노드를 검정색으로 칠하겠습니다.


"2번 규칙 - 루트 노드는 검정이다"


② 기존의 노드에 새로운 노드 '2'가 들어왔습니다. '2'는 '1'보다 크므로 '1'의 오른쪽에 옵니다. 여기서 새로 들어오는 노드는 무조건 빨강색입니다. 이유는 새로운 노드의 초기값이 빨강으로 되어있기 때문이죠.


"새로 들어오는 노드는 무조건 빨강이다"


③ '3'을 삽입해 보았습니다. 헉! 하지만 이때 4번 규칙을 위반하게 되는군요. 이럴 경우에는 여러가지 경우의 수로 분기할 수 있습니다.(아래 5가지 경우 중에 2번에 해당) 레드 블랙 트리에서는 부모가 빨강일때 새로운 노드가 삽입된다면, 새로 삽입되는 노드의 위치가 왼쪽 또는 오른쪽에 오느냐에 따라 결과가 달라집니다. 여기서는 부모의 오른쪽에 오므로 ⑴할아버지를 중심으로 왼쪽으로 회전(__rb_rotate_left)하게 됩니다. 그리고 ⑵내려온 노드는 빨강이 되고 올라간 노드는 검정이 됩니다.


"부모가 빨강일때 노드가 빨강이라면 발생할 수 있는 경우의 수는 총 5가지다"

⑴ 삼촌이 없고 새노드가 부모의 왼쪽 자식인 경우 (X)

 삼촌이 없고 새노드가 부모의 오른쪽 자식인 경우 (O)

⑶ 삼촌이 있고 삼촌도 빨간색일 경우 (X)

⑷ 삼촌이 있고 삼촌은 검은색이며 새노드가 부모의 왼쪽 자식인 경우 (X)

⑸ 삼촌이 있고 삼촌은 검은색이며 새노드가 부모의 오른쪽 자식인 경우 (X)


④ '4'를 삽입하게 되었을때 삼촌이 있고 삼촌도 빨간색일 경우라면 어떻게 될까요? 이럴 때는 기존 노드의 색상을 수정하게 됩니다. 바로 부모노드와 삼촌노드를 검은색으로 칠하고 할아버지 노드를 빨간색으로 칠하면 됩니다. 하지만 할아버지를 빨간색으로 칠하게 되면 2번 규칙에 위배되므로 다시 검정색으로 칠합니다.


"부모가 빨강일때 노드가 빨강이라면 발생할 수 있는 경우의 수는 총 5가지다"

⑴ 삼촌이 없고 새노드가 부모의 왼쪽 자식인 경우 (X)

⑵ 삼촌이 없고 새노드가 부모의 오른쪽 자식인 경우 (X)

⑶ 삼촌이 있고 삼촌도 빨간색일 경우 (O)

⑷ 삼촌이 있고 삼촌은 검은색이며 새노드가 부모의 왼쪽 자식인 경우 (X)

⑸ 삼촌이 있고 삼촌은 검은색이며 새노드가 부모의 오른쪽 자식인 경우 (X)


⑤ '5'를 삽입하였습니다. 아래의 경우중 2번에 해당하므로 ⑴할아버지를 중심으로 왼쪽으로 회전(__rb_rotate_left)하게 됩니다. 그리고 ⑵내려온 노드는 빨강이 되고 올라간 노드는 검정이 됩니다. 아까 한번 했었던 동작이죠?ㅎㅎㅎ


"부모가 빨강일때 노드가 빨강이라면 발생할 수 있는 경우의 수는 총 5가지다"

⑴ 삼촌이 없고 새노드가 부모의 왼쪽 자식인 경우 (X)

⑵ 삼촌이 없고 새노드가 부모의 오른쪽 자식인 경우 (O)

⑶ 삼촌이 있고 삼촌도 빨간색일 경우 (X)

⑷ 삼촌이 있고 삼촌은 검은색이며 새노드가 부모의 왼쪽 자식인 경우 (X)

⑸ 삼촌이 있고 삼촌은 검은색이며 새노드가 부모의 오른쪽 자식인 경우 (X)


⑦ '6'을 삽입하였습니다. 아까와 같은 경우가 또 왔군요. 삼촌이 있고 삼촌도 빨간색일 경우라면 부모노드와 삼촌노드를 검은색으로 칠하고 할아버지 노드를 빨간색으로 칠하면 됩니다.


"부모가 빨강일때 노드가 빨강이라면 발생할 수 있는 경우의 수는 총 5가지다"

⑴ 삼촌이 없고 새노드가 부모의 왼쪽 자식인 경우 (X)

⑵ 삼촌이 없고 새노드가 부모의 오른쪽 자식인 경우 (X)

⑶ 삼촌이 있고 삼촌도 빨간색일 경우 (O)

⑷ 삼촌이 있고 삼촌은 검은색이며 새노드가 부모의 왼쪽 자식인 경우 (X)

⑸ 삼촌이 있고 삼촌은 검은색이며 새노드가 부모의 오른쪽 자식인 경우 (X)


⑧ '7'을 삽입하였습니다. 아래의 경우중 2번에 해당하므로 ⑴할아버지를 중심으로 왼쪽으로 회전(__rb_rotate_left)하게 됩니다. 그리고 ⑵내려온 노드는 빨강이 되고 올라간 노드는 검정이 됩니다. 그런데 트리가 뭔가 어정쩡한게 균형이 안 맞아보이기는 합니다; 과연...


"부모가 빨강일때 노드가 빨강이라면 발생할 수 있는 경우의 수는 총 5가지다"

⑴ 삼촌이 없고 새노드가 부모의 왼쪽 자식인 경우 (X)

⑵ 삼촌이 없고 새노드가 부모의 오른쪽 자식인 경우 (O)

⑶ 삼촌이 있고 삼촌도 빨간색일 경우 (X)

⑷ 삼촌이 있고 삼촌은 검은색이며 새노드가 부모의 왼쪽 자식인 경우 (X)

⑸ 삼촌이 있고 삼촌은 검은색이며 새노드가 부모의 오른쪽 자식인 경우 (X)


⑨ '8'을 삽입하였습니다. 마찬가지로 삼촌이 있고 삼촌도 빨간색일 경우라면 부모노드와 삼촌노드를 검은색으로 칠하고 할아버지 노드를 빨간색으로 칠하면 됩니다. 

"부모가 빨강일때 노드가 빨강이라면 발생할 수 있는 경우의 수는 총 5가지다"

⑴ 삼촌이 없고 새노드가 부모의 왼쪽 자식인 경우 (X)

⑵ 삼촌이 없고 새노드가 부모의 오른쪽 자식인 경우 (X)

⑶ 삼촌이 있고 삼촌도 빨간색일 경우 (O)

⑷ 삼촌이 있고 삼촌은 검은색이며 새노드가 부모의 왼쪽 자식인 경우 (X)

⑸ 삼촌이 있고 삼촌은 검은색이며 새노드가 부모의 오른쪽 자식인 경우 (X) 


그런데 여기서 문제가 발생합니다. 색깔을 바꾸기는 했는데 여전히 할아버지 노드와 증조 할아버지 노드가 똑같은 빨강이군요. 여기서 레드 블랙 트리의 4번 규칙을 어긋나게 됩니다.

1. 모든 노드는 빨강 아니면 검정이다.

2. 루트 노드는 검정이다.

3. 모든 잎 노드는 검정이다.

4. 빨간 노드의 자식들은 모두 검정이다. 하지만 검정노드의 자식이 빨강일 필요가 없다.

5. 루트 노드에서 모든 잎 노드 사이에 있는 검은 색 노드의 수는 모두 동일하다.


 이럴 경우에는 아래 그림처럼 할아버지 노드를 새 노드로 생각하고 다시한번 규칙을 검사하게 됩니다. 


 할아버지 노드를 새 노드라고 생각하셨나요? 왜 그럴까라고 의심이 드시겠지만 일단 믿고 가자구요~ㅎㅎㅎ 그럼 다시 시작해보겠습니다. 새 노드인 '6'의 값을 가지는 노드의 부모를 보니 빨강입니다. 그렇다면 아래의 규칙 5번에 걸리게 되는군요. 생각해보니 지금까지 적용되었던 경우의 수중에 5번은 처음입니다. 과연 5번일 경우에는 노드가 어떻게 변하게 될까요? 바로 아래 그림과 같습니다. 즉 ⑴할아버지를 중심으로 왼쪽으로 회전(__rb_rotate_left)하게 됩니다. 그리고 ⑵내려온 노드는 빨강이 되고 올라간 노드는 검정이 됩니다. 그런데 여기서 부모 노드가 올라가면서 왼쪽 자식을 버리게 되는데, 이때 ⑶내려온 노드가 올라온 노드의 왼쪽 자식을 입양합니다. 

"부모가 빨강일때 노드가 빨강이라면 발생할 수 있는 경우의 수는 총 5가지다"

⑴ 삼촌이 없고 새노드가 부모의 왼쪽 자식인 경우 (X)

⑵ 삼촌이 없고 새노드가 부모의 오른쪽 자식인 경우 (X)

⑶ 삼촌이 있고 삼촌도 빨간색일 경우 (X)

⑷ 삼촌이 있고 삼촌은 검은색이며 새노드가 부모의 왼쪽 자식인 경우 (X)

⑸ 삼촌이 있고 삼촌은 검은색이며 새노드가 부모의 오른쪽 자식인 경우 (O)


⑩ 우와~ 1에서 8까지 삽입이 끝나고 나니 자동으로 균형을 이루고 있는 트리를 볼 수 있습니다. 놀랍지 않습니까? 이것이 바로 레드 블랙 트리 입니다.


이렇듯 레드 블랙 트리는 삽입과 동시에 균형을 맞추고 있으며 최소한의 포인터 연산으로 균형을 잡고 있음을 알 수 있습니다. 그럼 진짜로 위의 메커니즘대로 작동하는지 커널 코드를 윈도우 환경에 맞게 변형하여 테스트 보았습니다. 아래 스크린 샷에 보여지는 트리는 레드 블랙 트리를 왼쪽으로 눕혀놓은 거라고 보시면 됩니다. ^^


커널 코드를 분석하기에 앞서 윈도우에 돌아가는 변형된 레드 블랙 트리 코드를 설명하는 것은 개념을 자칫 흔들 수 있기에 생략하도록 하겠습니다. 그럼 이제 레드 블랙 트리가 뭔지 알았으니 커널 코드를 봐야겠죠? 위의 레드 블랙 트리가 리눅스에 어떻게 적용되었는지 리눅스 커널(Linux Kernel version 3.3)을 통해 살펴보도록 하겠습니다.


아래는 linux-3.3.3\linux-3.3.3\include\linux\rbtree.h 의 내용입니다.

1
2
3
4
5
6
7
8
9
10
11
12
13
14
15
16
17
18
19
20
21
22
23
24
25
26
27
28
29
30
31
32
33
34
35
36
37
38
39
40
41
42
43
44
45
46
47
48
49
50
51
52
53
54
55
56
57
58
59
60
61
62
63
64
65
66
67
68
69
70
71
72
73
74
75
76
77
78
79
80
81
82
83
84
85
86
87
88
89
90
91
92
93
94
95
96
97
98
99
100
101
102
103
104
105
106
107
108
109
110
111
112
113
114
115
116
117
118
119
120
121
122
123
124
125
126
127
128
129
130
131
132
133
134
135
136
137
138
139
140
141
142
143
144
145
146
147
148
149
150
151
152
153
154
155
156
157
158
159
160
161
162
163
164
165
166
167
168
169
170
171
172
173
174
175
176
177
/*
  Red Black Trees
  (C) 1999  Andrea Arcangeli<andrea@suse.de>
   
  This program is free software; you can redistribute it and/or modify
  it under the terms of the GNU General Public License as published by
  the Free Software Foundation; either version 2 of the License, or
  (at your option) any later version.
 
  This program is distributed in the hope that it will be useful,
  but WITHOUT ANY WARRANTY; without even the implied warranty of
  MERCHANTABILITY or FITNESS FOR A PARTICULAR PURPOSE.  See the
  GNU General Public License for more details.
 
  You should have received a copy of the GNU General Public License
  along with this program; if not, write to the Free Software
  Foundation, Inc., 59 Temple Place, Suite 330, Boston, MA  02111-1307  USA
 
  linux/include/linux/rbtree.h
 
  To use rbtrees you'll have to implement your own insert and search cores.
  This will avoid us to use callbacks and to drop drammatically performances.
  I know it's not the cleaner way,  but in C (not in C++) to get
  performances and genericity...
 
  Some example of insert and search follows here. The search is a plain
  normal search over an ordered tree. The insert instead must be implemented
  in two steps: First, the code must insert the element in order as a red leaf
  in the tree, and then the support library function rb_insert_color() must
  be called. Such function will do the not trivial work to rebalance the
  rbtree, if necessary.
 
-----------------------------------------------------------------------
static inline struct page * rb_search_page_cache(struct inode * inode,
                         unsigned long offset)
{
    struct rb_node * n = inode->i_rb_page_cache.rb_node;
    struct page * page;
 
    while (n)
    {
        page = rb_entry(n, struct page, rb_page_cache);
 
        if (offset< page->offset)
            n = n->rb_left;
        else if (offset > page->offset)
            n = n->rb_right;
        else
            return page;
    }
    return NULL;
}
 
static inline struct page * __rb_insert_page_cache(struct inode * inode,
                           unsigned long offset,
                           struct rb_node * node)
{
    struct rb_node ** p = &inode->i_rb_page_cache.rb_node;
    struct rb_node * parent = NULL;
    struct page * page;
 
    while (*p)
    {
        parent = *p;
        page = rb_entry(parent, struct page, rb_page_cache);
 
        if (offset< page->offset)
            p = &(*p)->rb_left;
        else if (offset > page->offset)
            p = &(*p)->rb_right;
        else
            return page;
    }
 
    rb_link_node(node, parent, p);
 
    return NULL;
}
 
static inline struct page * rb_insert_page_cache(struct inode * inode,
                         unsigned long offset,
                         struct rb_node * node)
{
    struct page * ret;
    if ((ret = __rb_insert_page_cache(inode, offset, node)))
        goto out;
    rb_insert_color(node, &inode->i_rb_page_cache);
 out:
    return ret;
}
-----------------------------------------------------------------------
*/
 
#ifndef _LINUX_RBTREE_H
#define _LINUX_RBTREE_H
 
#include<linux/kernel.h>
#include<linux/stddef.h>
 
struct rb_node
{
    unsigned long  rb_parent_color;
#define RB_RED      0
#define RB_BLACK    1
    struct rb_node *rb_right;
    struct rb_node *rb_left;
} __attribute__((aligned(sizeof(long))));
    /* The alignment might seem pointless, but allegedly CRIS needs it */
 
struct rb_root
{
    struct rb_node *rb_node;
};
 
 
#define rb_parent(r)   ((struct rb_node *)((r)->rb_parent_color & ~3))
#define rb_color(r)   ((r)->rb_parent_color & 1)
#define rb_is_red(r)   (!rb_color(r))
#define rb_is_black(r) rb_color(r)
#define rb_set_red(r)  do { (r)->rb_parent_color &= ~1; } while (0)
#define rb_set_black(r)  do { (r)->rb_parent_color |= 1; } while (0)
 
static inline void rb_set_parent(struct rb_node *rb, struct rb_node *p)
{
    rb->rb_parent_color = (rb->rb_parent_color & 3) | (unsigned long)p;
}
static inline void rb_set_color(struct rb_node *rb, int color)
{
    rb->rb_parent_color = (rb->rb_parent_color & ~1) | color;
}
 
#define RB_ROOT (struct rb_root) { NULL, }
#define rb_entry(ptr, type, member) container_of(ptr, type, member)
 
#define RB_EMPTY_ROOT(root) ((root)->rb_node == NULL)
#define RB_EMPTY_NODE(node) (rb_parent(node) == node)
#define RB_CLEAR_NODE(node) (rb_set_parent(node, node))
 
static inline void rb_init_node(struct rb_node *rb)
{
    rb->rb_parent_color = 0;
    rb->rb_right = NULL;
    rb->rb_left = NULL;
    RB_CLEAR_NODE(rb);
}
 
extern void rb_insert_color(struct rb_node *, struct rb_root *);
extern void rb_erase(struct rb_node *, struct rb_root *);
 
typedef void (*rb_augment_f)(struct rb_node *node, void *data);
 
extern void rb_augment_insert(struct rb_node *node,
                  rb_augment_f func, void *data);
extern struct rb_node *rb_augment_erase_begin(struct rb_node *node);
extern void rb_augment_erase_end(struct rb_node *node,
                 rb_augment_f func, void *data);
 
/* Find logical next and previous nodes in a tree */
extern struct rb_node *rb_next(const struct rb_node *);
extern struct rb_node *rb_prev(const struct rb_node *);
extern struct rb_node *rb_first(const struct rb_root *);
extern struct rb_node *rb_last(const struct rb_root *);
 
/* Fast replacement of a single node without remove/rebalance/add/rebalance */
extern void rb_replace_node(struct rb_node *victim, struct rb_node *new,
                struct rb_root *root);
 
static inline void rb_link_node(struct rb_node * node, struct rb_node * parent,
                struct rb_node ** rb_link)
{
    node->rb_parent_color = (unsigned long )parent;
    node->rb_left = node->rb_right = NULL;
 
    *rb_link = node;
}
 
#endif  /* _LINUX_RBTREE_H */

위에 외부 지정자 extern으로 선언된 함수나 구조체 변수들은 구현부 파일에서 확인할 수 있습니다. 구현부 파일은 아래와 같습니다.


아래는 linux-3.3.3\linux-3.3.3\lib\rbtree.c 의 내용입니다.
1
2
3
4
5
6
7
8
9
10
11
12
13
14
15
16
17
18
19
20
21
22
23
24
25
26
27
28
29
30
31
32
33
34
35
36
37
38
39
40
41
42
43
44
45
46
47
48
49
50
51
52
53
54
55
56
57
58
59
60
61
62
63
64
65
66
67
68
69
70
71
72
73
74
75
76
77
78
79
80
81
82
83
84
85
86
87
88
89
90
91
92
93
94
95
96
97
98
99
100
101
102
103
104
105
106
107
108
109
110
111
112
113
114
115
116
117
118
119
120
121
122
123
124
125
126
127
128
129
130
131
132
133
134
135
136
137
138
139
140
141
142
143
144
145
146
147
148
149
150
151
152
153
154
155
156
157
158
159
160
161
162
163
164
165
166
167
168
169
170
171
172
173
174
175
176
177
178
179
180
181
182
183
184
185
186
187
188
189
190
191
192
193
194
195
196
197
198
199
200
201
202
203
204
205
206
207
208
209
210
211
212
213
214
215
216
217
218
219
220
221
222
223
224
225
226
227
228
229
230
231
232
233
234
235
236
237
238
239
240
241
242
243
244
245
246
247
248
249
250
251
252
253
254
255
256
257
258
259
260
261
262
263
264
265
266
267
268
269
270
271
272
273
274
275
276
277
278
279
280
281
282
283
284
285
286
287
288
289
290
291
292
293
294
295
296
297
298
299
300
301
302
303
304
305
306
307
308
309
310
311
312
313
314
315
316
317
318
319
320
321
322
323
324
325
326
327
328
329
330
331
332
333
334
335
336
337
338
339
340
341
342
343
344
345
346
347
348
349
350
351
352
353
354
355
356
357
358
359
360
361
362
363
364
365
366
367
368
369
370
371
372
373
374
375
376
377
378
379
380
381
382
383
384
385
386
387
388
389
390
391
392
393
394
395
396
397
398
399
400
401
402
403
404
405
406
407
408
409
410
411
412
413
414
415
416
417
418
419
420
421
422
423
424
425
426
427
428
429
430
431
432
433
434
435
436
437
438
439
440
441
442
443
444
445
446
447
448
449
450
451
452
453
454
455
456
457
458
459
460
461
462
/*
  Red Black Trees
  (C) 1999  Andrea Arcangeli<andrea@suse.de>
  (C) 2002  David Woodhouse<dwmw2@infradead.org>
   
  This program is free software; you can redistribute it and/or modify
  it under the terms of the GNU General Public License as published by
  the Free Software Foundation; either version 2 of the License, or
  (at your option) any later version.
 
  This program is distributed in the hope that it will be useful,
  but WITHOUT ANY WARRANTY; without even the implied warranty of
  MERCHANTABILITY or FITNESS FOR A PARTICULAR PURPOSE.  See the
  GNU General Public License for more details.
 
  You should have received a copy of the GNU General Public License
  along with this program; if not, write to the Free Software
  Foundation, Inc., 59 Temple Place, Suite 330, Boston, MA  02111-1307  USA
 
  linux/lib/rbtree.c
*/
 
#include<linux/rbtree.h>
#include<linux/module.h>
 
static void __rb_rotate_left(struct rb_node *node, struct rb_root *root)
{
    struct rb_node *right = node->rb_right;
    struct rb_node *parent = rb_parent(node);
 
    if ((node->rb_right = right->rb_left))
        rb_set_parent(right->rb_left, node);
    right->rb_left = node;
 
    rb_set_parent(right, parent);
 
    if (parent)
    {
        if (node == parent->rb_left)
            parent->rb_left = right;
        else
            parent->rb_right = right;
    }
    else
        root->rb_node = right;
    rb_set_parent(node, right);
}
 
static void __rb_rotate_right(struct rb_node *node, struct rb_root *root)
{
    struct rb_node *left = node->rb_left;
    struct rb_node *parent = rb_parent(node);
 
    if ((node->rb_left = left->rb_right))
        rb_set_parent(left->rb_right, node);
    left->rb_right = node;
 
    rb_set_parent(left, parent);
 
    if (parent)
    {
        if (node == parent->rb_right)
            parent->rb_right = left;
        else
            parent->rb_left = left;
    }
    else
        root->rb_node = left;
    rb_set_parent(node, left);
}
 
void rb_insert_color(struct rb_node *node, struct rb_root *root)
{
    struct rb_node *parent, *gparent;
 
    while ((parent = rb_parent(node)) && rb_is_red(parent))
    {
        gparent = rb_parent(parent);
 
        if (parent == gparent->rb_left)
        {
            {
                register struct rb_node *uncle = gparent->rb_right;
                if (uncle && rb_is_red(uncle))
                {
                    rb_set_black(uncle);
                    rb_set_black(parent);
                    rb_set_red(gparent);
                    node = gparent;
                    continue;
                }
            }
 
            if (parent->rb_right == node)
            {
                register struct rb_node *tmp;
                __rb_rotate_left(parent, root);
                tmp = parent;
                parent = node;
                node = tmp;
            }
 
            rb_set_black(parent);
            rb_set_red(gparent);
            __rb_rotate_right(gparent, root);
        } else {
            {
                register struct rb_node *uncle = gparent->rb_left;
                if (uncle && rb_is_red(uncle))
                {
                    rb_set_black(uncle);
                    rb_set_black(parent);
                    rb_set_red(gparent);
                    node = gparent;
                    continue;
                }
            }
 
            if (parent->rb_left == node)
            {
                register struct rb_node *tmp;
                __rb_rotate_right(parent, root);
                tmp = parent;
                parent = node;
                node = tmp;
            }
 
            rb_set_black(parent);
            rb_set_red(gparent);
            __rb_rotate_left(gparent, root);
        }
    }
 
    rb_set_black(root->rb_node);
}
EXPORT_SYMBOL(rb_insert_color);
 
static void __rb_erase_color(struct rb_node *node, struct rb_node *parent,
                 struct rb_root *root)
{
    struct rb_node *other;
 
    while ((!node || rb_is_black(node)) && node != root->rb_node)
    {
        if (parent->rb_left == node)
        {
            other = parent->rb_right;
            if (rb_is_red(other))
            {
                rb_set_black(other);
                rb_set_red(parent);
                __rb_rotate_left(parent, root);
                other = parent->rb_right;
            }
            if ((!other->rb_left || rb_is_black(other->rb_left)) &&
                (!other->rb_right || rb_is_black(other->rb_right)))
            {
                rb_set_red(other);
                node = parent;
                parent = rb_parent(node);
            }
            else
            {
                if (!other->rb_right || rb_is_black(other->rb_right))
                {
                    rb_set_black(other->rb_left);
                    rb_set_red(other);
                    __rb_rotate_right(other, root);
                    other = parent->rb_right;
                }
                rb_set_color(other, rb_color(parent));
                rb_set_black(parent);
                rb_set_black(other->rb_right);
                __rb_rotate_left(parent, root);
                node = root->rb_node;
                break;
            }
        }
        else
        {
            other = parent->rb_left;
            if (rb_is_red(other))
            {
                rb_set_black(other);
                rb_set_red(parent);
                __rb_rotate_right(parent, root);
                other = parent->rb_left;
            }
            if ((!other->rb_left || rb_is_black(other->rb_left)) &&
                (!other->rb_right || rb_is_black(other->rb_right)))
            {
                rb_set_red(other);
                node = parent;
                parent = rb_parent(node);
            }
            else
            {
                if (!other->rb_left || rb_is_black(other->rb_left))
                {
                    rb_set_black(other->rb_right);
                    rb_set_red(other);
                    __rb_rotate_left(other, root);
                    other = parent->rb_left;
                }
                rb_set_color(other, rb_color(parent));
                rb_set_black(parent);
                rb_set_black(other->rb_left);
                __rb_rotate_right(parent, root);
                node = root->rb_node;
                break;
            }
        }
    }
    if (node)
        rb_set_black(node);
}
 
void rb_erase(struct rb_node *node, struct rb_root *root)
{
    struct rb_node *child, *parent;
    int color;
 
    if (!node->rb_left)
        child = node->rb_right;
    else if (!node->rb_right)
        child = node->rb_left;
    else
    {
        struct rb_node *old = node, *left;
 
        node = node->rb_right;
        while ((left = node->rb_left) != NULL)
            node = left;
 
        if (rb_parent(old)) {
            if (rb_parent(old)->rb_left == old)
                rb_parent(old)->rb_left = node;
            else
                rb_parent(old)->rb_right = node;
        } else
            root->rb_node = node;
 
        child = node->rb_right;
        parent = rb_parent(node);
        color = rb_color(node);
 
        if (parent == old) {
            parent = node;
        } else {
            if (child)
                rb_set_parent(child, parent);
            parent->rb_left = child;
 
            node->rb_right = old->rb_right;
            rb_set_parent(old->rb_right, node);
        }
 
        node->rb_parent_color = old->rb_parent_color;
        node->rb_left = old->rb_left;
        rb_set_parent(old->rb_left, node);
 
        goto color;
    }
 
    parent = rb_parent(node);
    color = rb_color(node);
 
    if (child)
        rb_set_parent(child, parent);
    if (parent)
    {
        if (parent->rb_left == node)
            parent->rb_left = child;
        else
            parent->rb_right = child;
    }
    else
        root->rb_node = child;
 
 color:
    if (color == RB_BLACK)
        __rb_erase_color(child, parent, root);
}
EXPORT_SYMBOL(rb_erase);
 
static void rb_augment_path(struct rb_node *node, rb_augment_f func, void *data)
{
    struct rb_node *parent;
 
up:
    func(node, data);
    parent = rb_parent(node);
    if (!parent)
        return;
 
    if (node == parent->rb_left && parent->rb_right)
        func(parent->rb_right, data);
    else if (parent->rb_left)
        func(parent->rb_left, data);
 
    node = parent;
    goto up;
}
 
/*
 * after inserting @node into the tree, update the tree to account for
 * both the new entry and any damage done by rebalance
 */
void rb_augment_insert(struct rb_node *node, rb_augment_f func, void *data)
{
    if (node->rb_left)
        node = node->rb_left;
    else if (node->rb_right)
        node = node->rb_right;
 
    rb_augment_path(node, func, data);
}
EXPORT_SYMBOL(rb_augment_insert);
 
/*
 * before removing the node, find the deepest node on the rebalance path
 * that will still be there after @node gets removed
 */
struct rb_node *rb_augment_erase_begin(struct rb_node *node)
{
    struct rb_node *deepest;
 
    if (!node->rb_right && !node->rb_left)
        deepest = rb_parent(node);
    else if (!node->rb_right)
        deepest = node->rb_left;
    else if (!node->rb_left)
        deepest = node->rb_right;
    else {
        deepest = rb_next(node);
        if (deepest->rb_right)
            deepest = deepest->rb_right;
        else if (rb_parent(deepest) != node)
            deepest = rb_parent(deepest);
    }
 
    return deepest;
}
EXPORT_SYMBOL(rb_augment_erase_begin);
 
/*
 * after removal, update the tree to account for the removed entry
 * and any rebalance damage.
 */
void rb_augment_erase_end(struct rb_node *node, rb_augment_f func, void *data)
{
    if (node)
        rb_augment_path(node, func, data);
}
EXPORT_SYMBOL(rb_augment_erase_end);
 
/*
 * This function returns the first node (in sort order) of the tree.
 */
struct rb_node *rb_first(const struct rb_root *root)
{
    struct rb_node  *n;
 
    n = root->rb_node;
    if (!n)
        return NULL;
    while (n->rb_left)
        n = n->rb_left;
    return n;
}
EXPORT_SYMBOL(rb_first);
 
struct rb_node *rb_last(const struct rb_root *root)
{
    struct rb_node  *n;
 
    n = root->rb_node;
    if (!n)
        return NULL;
    while (n->rb_right)
        n = n->rb_right;
    return n;
}
EXPORT_SYMBOL(rb_last);
 
struct rb_node *rb_next(const struct rb_node *node)
{
    struct rb_node *parent;
 
    if (rb_parent(node) == node)
        return NULL;
 
    /* If we have a right-hand child, go down and then left as far
       as we can. */
    if (node->rb_right) {
        node = node->rb_right;
        while (node->rb_left)
            node=node->rb_left;
        return (struct rb_node *)node;
    }
 
    /* No right-hand children.  Everything down and left is
       smaller than us, so any 'next' node must be in the general
       direction of our parent. Go up the tree; any time the
       ancestor is a right-hand child of its parent, keep going
       up. First time it's a left-hand child of its parent, said
       parent is our 'next' node. */
    while ((parent = rb_parent(node)) && node == parent->rb_right)
        node = parent;
 
    return parent;
}
EXPORT_SYMBOL(rb_next);
 
struct rb_node *rb_prev(const struct rb_node *node)
{
    struct rb_node *parent;
 
    if (rb_parent(node) == node)
        return NULL;
 
    /* If we have a left-hand child, go down and then right as far
       as we can. */
    if (node->rb_left) {
        node = node->rb_left;
        while (node->rb_right)
            node=node->rb_right;
        return (struct rb_node *)node;
    }
 
    /* No left-hand children. Go up till we find an ancestor which
       is a right-hand child of its parent */
    while ((parent = rb_parent(node)) && node == parent->rb_left)
        node = parent;
 
    return parent;
}
EXPORT_SYMBOL(rb_prev);
 
void rb_replace_node(struct rb_node *victim, struct rb_node *new,
             struct rb_root *root)
{
    struct rb_node *parent = rb_parent(victim);
 
    /* Set the surrounding nodes to point to the replacement */
    if (parent) {
        if (victim == parent->rb_left)
            parent->rb_left = new;
        else
            parent->rb_right = new;
    } else {
        root->rb_node = new;
    }
    if (victim->rb_left)
        rb_set_parent(victim->rb_left, new);
    if (victim->rb_right)
        rb_set_parent(victim->rb_right, new);
 
    /* Copy the pointers/colour from the victim to the replacement */
    *new = *victim;
}
EXPORT_SYMBOL(rb_replace_node);


레드 블랙 트리 코드를 확인하셨나요? ㅎㄷㄷ 

539 라인이나 되는 코드에 아직까지는 먼소린지 감이 안 잡힐 수도 있습니다. 하지만 이 정도에 아직 놀라시면 안됩니다. 이 rbtree 코드 안에는 삽입을 하는 함수가 존재하지 않으니깐요.. 엥?? 그럼 도대체 이 알고리즘을 개발한 작자는 어떻게 삽입하는 함수부를 구현해라는 걸까요? 설마 코드 보고 알아서 분석해서 개발하라는 거는 너무 무책임한 주문을 하는 것을 아닐테고 말이죠. 다행스럽게도 레드 블랙 트리 커널 코드를 개발하신 분은 그렇게 인정이 없지 않았습니다. 'rbtree.h'의 주석을 살펴보시면 Andrea라는 아저씨가 주석에다가 힌트를 남겨놓은 것을 확인할 수 있습니다. 주석을 참고해서 개발해라는 건데 요래서 주석을 잘 달아야 한다는거 아시겠죠?


1
2
3
4
5
6
7
8
9
10
11
12
13
14
15
16
17
18
19
20
21
22
23
24
25
26
27
28
29
30
31
32
33
34
35
36
37
static inline struct page * __rb_insert_page_cache(struct inode * inode,
                           unsigned long offset,
                           struct rb_node * node)
{
    struct rb_node ** p = &inode->i_rb_page_cache.rb_node;
    struct rb_node * parent = NULL;
    struct page * page;
 
    while (*p)
    {
        parent = *p;
        page = rb_entry(parent, struct page, rb_page_cache);
 
        if (offset< page->offset)
            p = &(*p)->rb_left;
        else if (offset > page->offset)
            p = &(*p)->rb_right;
        else
            return page;
    }
 
    rb_link_node(node, parent, p);
 
    return NULL;
}
 
static inline struct page * rb_insert_page_cache(struct inode * inode,
                         unsigned long offset,
                         struct rb_node * node)
{
    struct page * ret;
    if ((ret = __rb_insert_page_cache(inode, offset, node)))
        goto out;
    rb_insert_color(node, &inode->i_rb_page_cache);
 out:
    return ret;
}


 레드 블랙 트리의 삽입을 설명하기에 앞서 우선 레드 블랙 트리의 구조체부터 살펴보겠습니다. 구조체를 가만히 살펴보니 낮선 코드가 눈에 보이는군요. 바로 구조체 안에 #define구문이 선언되어 있습니다; 이것은 레드 블랙 트리 구조체의 가독성을 높이기 위한 목적으로 사용되었는데 어짜피 매크로 구문은 컴파일시 코드로 변환되기 때문에 상관없는 것이죠. 


그럼 아래의 아래 attribute__((aligned(sizeof(long))))는 무엇일까요? 점점 난해해집니다..이것은 Linux gcc 컴파일러에서 확장적으로 지원하는 것으로 윈도우의 #progrma pack과 비슷한 개념입니다. 구조체의 시작 주소를 정렬하라는 것인데 구조체의 전체의 사이즈가 무조건 address의 4 byte alingnment에 맞춰라는 이야기 입니다. 즉 주소가 0, 4, 8, 12... 이렇게 늘어가게 되는 것이죠. 이렇게 하게되면 주소를 2진수로 봤을 때 주소가 4의 배수로 뛰기때문에 마지막 2비트는 0으로 고정되어 있습니다. 즉 최하위 2비트는 비게되므로 레드 블랙 트리에서는 이 공간을 색상을 저장하는 용도로 사용하고 있습니다. 실제로는 그 중에서도 1비트만 사용하고 있지만요 ㅎㅎ 사실 커널 2.4버전에서는 rb_parent와 rb_color가 따로 분리되어 있었지만 2.6 이후로는 하나의 변수로 공유하기 시작했다네요. 대단한 테크닉이죠! 언젠가 제가 rb_tree에 대한 자료를 알아보기 위해 네이버 지식인님들을 순례하고 있었는데 레드 블랙 트리의 약점을 묻는 지식인 질문에 아무개님(?)이 대답한 답글이 생각납니다.


"레드 블랙 트리는 구조체에 색상을 따로 저장해야 하기에 더 많은 용량을 차지하게 되므로 다른 트리에 비해 비효율적이다" 라는 답글이었습니다. 하지만 실제로는 그렇지 않다는 것을 알 수 있겠지요? 하나의 변수를 공유하고 있으니깐요.^^


struct rb_node
{
    unsigned long rb_parent_color;
    #define RB_RED 0
    #define RB_BLACK 1
    struct rb_node *rb_right;
    struct rb_node *rb_left;
} __attribute__((aligned(sizeof(long))));
/* The alignment might seem pointless, but allegedly CRIS needs it */


 아래로 내려가면 단 하나의 rb_node* 변수를 싸고 있는 구조체를 볼 수 있습니다. 구조체로 싸고 있는 놈도 하나인데 이렇게 사용하는 이유는 나중에 구조체의 확장을 위해 사용한 테크닉이라고 합니다. 캡슐화죠ㅎㅎ 역시 고수님들께 참 많은 테크닉을 배울 수 있는 것 같습니다.


struct rb_root
{
    struct rb_node *rb_node;
};


아래를 보니 비트연산을 매크로 함수로 만들어놓은 구문이 눈에 들어오는군요. 비트 연산이 들어가면 괜히 먼가 복잡해 보입니다..ㅠ_ㅠ 저만 그런가요?ㅎㅎ 우선 rb_parent(r) 를 보면 rb_parent_color 변수에 ~3을 &연산하고 있습니다. 이것은 하위 2비트는 빼고 나머지 비트를 뽑아서 (struct rb_node *)로 강제형변환 해주고 있는 것을 확인 할 수 있습니다. 즉 이것은 부모의 노드를 가르키는 포인터를 뽑아 내는 거라 보심됩니다. 그럼 반대로 하위 2비트를 보는 함수도 봐야겠군요.  rb_color(r) 함수를 보면 1을 &연산하고 있는게 보이는데 이를보니 하위 2비트 전부를 사용하지는 않고 1비트만 활용하고 있다는 것을 알 수 있습니다. 그렇다면 나머지 한 비트의 의미는 뭘까요? 백업용일까요? 제 생각에는 나중에 확장성을 고려해서 남겨둔 것 같은데 그 의미는 알 길이 없군요. ㅎㅎ 메일 이라도 보내봐야 할까봅니다.^^; 아무튼 다음 매크로 함수들의 의미를 보면 해석하는데 크게 어려움이 없을 겁니다. rb_is_red는 노드의 색이 빨간색인지 물어보고 있고, rb_is_black은 노드의 색이 검정인지 물어보며, rb_set_red는 노드를 빨간색으로 셋팅, rb_set_black은 검정으로 셋팅하는 매크로 함수들 입니다. 어렵지 않죠??


#define rb_parent(r)   ((struct rb_node *)((r)->rb_parent_color & ~3))
#define rb_color(r)   ((r)->rb_parent_color & 1)
#define rb_is_red(r)   (!rb_color(r))
#define rb_is_black(r) rb_color(r)
#define rb_set_red(r)  do { (r)->rb_parent_color &= ~1; } while (0)
#define rb_set_black(r)  do { (r)->rb_parent_color |= 1; } while (0)

static inline void rb_set_parent(struct rb_node *rb, struct rb_node *p)
{
    rb->rb_parent_color = (rb->rb_parent_color & 3) | (unsigned long)p;
}
static inline void rb_set_color(struct rb_node *rb, int color)
{
    rb->rb_parent_color = (rb->rb_parent_color & ~1) | color;
}


그런데 애매한 것이 있는데 rb_set_red 매크로에서 do{ ... }while(0)은 왜 저렇게 사용하고 있을까 하시는 분들이 있으실 겁니다. 심심해서 저렇게 해놓은건 아닐테고 말이죠. 사실 저 구문을 사용하는 두 가지 이유가 있는데 첫번째는 블럭을 활용하기 위함이고, 두번째는 매크로 정의 구문에서 여러 문장이 사용되면 발생하는 에러를 막기 위함이라고 합니다. 두번째 이유의 예를 들자면 아래와 같은 경우를 예방하기 위한 것이죠.


1. 정의된 메크로

#define FOO(x) \
        printf("arg is %s\n", x); \
        do_something_useful(x);


2. 사용 예

if (blah == 2)

FOO(blah);   

else

...


3. 실제 내용

if (blah == 2)

printf("arg is %s\n", blah);

do_something_useful(blah);;/*  blah blah  */    <-- 요 부분 때문에 아래의 else에서 에러

else

...


아래 매크로 함수들도 이해하기기에는 크게 무리 없으실 겁니다. 비교적 코드가 짧죠? 그런데 눈에 익숙한 녀석이 가운데 보이실 겁니다. 바로 rb_entry죠? ㅎㅎㅎ 이 녀석은 저번 시간에 다뤘던 적이 있습니다. container_of(ptr, type, member) 라는 함수도 그 내용을 까보면 결국엔 list_entry(link, type, member)와 같은 넘입니다. 혹시 이 부분에 대한 이해가 없으시다면 직전 포스팅을 읽어보는 것을 추천드립니다.


#define RB_ROOT (struct rb_root) { NULL, }
#define rb_entry(ptr, type, member) container_of(ptr, type, member)

#define RB_EMPTY_ROOT(root) ((root)->rb_node == NULL)
#define RB_EMPTY_NODE(node) (rb_parent(node) == node)
#define RB_CLEAR_NODE(node) (rb_set_parent(node, node))


아래는 노드의 초기화 함수입니다. 한마디로 노드의 모든 값을 초기화 하고 있군요. rb->rb_parent_color의 값을 0으로 초기화한다는 것은 가르길 부모노드가 NULL이라는 것과 초기 노드의 컬러가 빨간색임을 의미합니다.


static inline void rb_init_node(struct rb_node *rb)
{
    rb->rb_parent_color = 0;
    rb->rb_right = NULL;
    rb->rb_left = NULL;
    RB_CLEAR_NODE(rb);
}


아래는 rb_insert_color와  rb_erase같은 함수들은 삽입과 삭제를 하는데 있어서 중요한 기능(rebalance)을 하고 있지만 외부 파일에 정의되어 있으므로 나중에 다시 나올 때 설명드리겠습니다. 다음으로 넘어가기 전에 typedef void (*rb_augment_f)(struct rb_node *node, void *data); 는 함수포인터를 typedef 지정자로 사용을 함수포인터의 사용을 간소화하기 위해 정의된 것입니다. 주로 바로 아래에 있는 rb_augment_insert 함수에서 매개변수로 던져지고 있다는 걸 알 수 있네요. 흠.. 오늘 다룰 기본적인 삽입, 삭제 함수와 무관하기에 일단은 패스하도록 하겠습니다~ 패스~


extern void rb_insert_color(struct rb_node *, struct rb_root *);
extern void rb_erase(struct rb_node *, struct rb_root *);

typedef void (*rb_augment_f)(struct rb_node *node, void *data);

extern void rb_augment_insert(struct rb_node *node, rb_augment_f func, void *data);
extern struct rb_node *rb_augment_erase_begin(struct rb_node *node);
extern void rb_augment_erase_end(struct rb_node *node, rb_augment_f func, void *data);


아래의 매크로들은 트리에서 노드를 찾기위한 여러가지 방법과 노드의 교환을 하는 기능을 가지는 함수를 설명하고 있습니다. 코드가 간단하기에 이 부분은 패스 하도록겠습니다. 패스~


/* Find logical next and previous nodes in a tree */
extern struct rb_node *rb_next(const struct rb_node *);
extern struct rb_node *rb_prev(const struct rb_node *);
extern struct rb_node *rb_first(const struct rb_root *);
extern struct rb_node *rb_last(const struct rb_root *);

/* Fast replacement of a single node without remove/rebalance/add/rebalance */
extern void rb_replace_node(struct rb_node *victim, struct rb_node *new, struct rb_root *root);


두번 이상 패스했더니 이번에는 패스하면 안 될 것 같은 느낌이 드는군요. ㅎㅎ 도둑이 제발 저린다고 하죠.. ^^

그럼 지금부터는 다시 자세하게 분석해보겠습니다. 아래의 함수는 노드를 만들었을 때 가장 처음 호출되는 녀석입니다. 이 함수의 역할은 노드끼리의 연결을 시켜주는 것이죠. 그렇다면 여기서 말하는 노드는 무엇일까요? 여기서 말하는 노드는 아직 트리에 추가되지 않은 노드를 말합니다. rb_link_node(struct rb_node * node, struct rb_node * parent, struct rb_node ** rb_link) 함수를 보면 노드는 3개의 인자 중 첫번째 인자로 들어가게 되는 놈이죠. 두번째 인자는 그 노드의 부모가 될 노드이고, 세번째 인자 rb_link가 삽입할 노드의 루트 또는 아직 연결되지 않은 부모의 left, right 링크를 가지고 있는 녀석입니다. 코드를 보면 rb_parent_color에 부모의 노드를 가르키게 하고 다음 줄에는 노드의 왼쪽과 오른쪽 링크를 NULL로 초기화 하고 있음을 알 수 있습니다. 계속해서 아래 rb_link는 루트나 상위노드의 링크를 연결하는 놈인데 나중에 삽입함수를 설명하면서 그림으로 다시 설명드리겠습니다.


static inline void rb_link_node(struct rb_node * node, struct rb_node * parent, struct rb_node ** rb_link)
{
    node->rb_parent_color = (unsigned long )parent;
    node->rb_left = node->rb_right = NULL;

    *rb_link = node;
}


아까전에도 말씀드렸던 것과 같이 리눅스 커널에는 삽입을 하는 함수가 없기에 직접 구현해줘야 합니다. 참 귀찮지만 Andrea라는 분이 그렇게 해라고 했었죠? 사실 아래 함수인 __rb_insert_page_cache(...)에서는 offset이라는 키값을 이용하여 삽입할 노드가 offset보다 크면 오른쪽에 삽입하고 작으면 왼쪽에 삽입하는 방식으로 구성되어 있습니다. 하지만 이것은 레드 블랙 트리 구현에 포함되어 질 수 없는  코드입니다. 이유는 리눅스에서 레드 블랙 트리 자료구조를 사용하는 부분은 다양하고 비교하는 알고리즘 자체도 하나가 아니라 수 가지가 될 수 있습니다. 때문에 그 목적에 따라 특정한 알고리즘이 포함되어 있는 삽입과 같은 부분은 사용자의 몫으로 남겨놓은 것이죠. 친절한(?) Andrea씨가 주석으로 제공한 아래의 삽입 코드를 먼저 보도록 하겠습니다.    


static inline struct page * __rb_insert_page_cache(struct inode * inode, unsigned long offset, struct rb_node * node)
{
    struct rb_node ** p = &inode->i_rb_page_cache.rb_node;
    struct rb_node * parent = NULL;
    struct page * page;

    while (*p)
    {
        parent = *p;
        page = rb_entry(parent, struct page, rb_page_cache);

        if (offset< page->offset)
            p = &(*p)->rb_left;

 else if (offset > page->offset)

            p = &(*p)->rb_right;
        else
            return page;
    }

    rb_link_node(node, parent, p);

    return NULL;
}

static inline struct page * rb_insert_page_cache(struct inode * inode, unsigned long offset, struct rb_node * node)
{
    struct page * ret;
    if ((ret = __rb_insert_page_cache(inode, offset, node)))
        goto out;


    rb_insert_color(node, &inode->i_rb_page_cache);


    out:
    return ret;
}


삽입코드는 아래 그림과 같이 크게 세가지 동작으로 구분 할 수 있습니다. 


① 오프셋을 비교하여 노드의 왼쪽, 오른쪽을 구분하는 부분

② 왼쪽 또는 오른쪽에 노드를 연결시키는 부분

③ 연결된 노드들을 레드 블랙 트리의 특성에 맞게 재구성하는 부분


이렇게 세가지 동작으로 구분할 수 있으며, 자세한 동작은 아래 그림과 같습니다. 참고로 그림에서 root는 inode를 말하는 것으로 이해를 돕기 위해 root로 표기하였습니다.


ⓐ inode(root)가 구성되어 있지 않고 가장 처음 삽입 함수가 수행되는 것 부터 보시겠습니다. 삽입할 노드는 offset 값이 2인 노드 입니다. 일단 root는 아무 값도 없기에 0(NULL)이며, 삽입함수의 마지막 매개변수값으로 들어온 structrb_node* node는 삽입할 뉴노드입니다. page 구조체 안에 ?로 채워져 있는 부분은 아직 초기화되지 않은 부분이라 생각하시면 됩니다. 그리고 여기서 p와 node는 struct rb_node의 시작주소를 임시로 저장하고 있습니다. 지금까지 말한 과정이 삽입 함수의 세가지 동작중 첫 번째 단계에 대한 설명입니다.


struct rb_node ** p = &inode->i_rb_page_cache.rb_node;
struct rb_node * parent = NULL;
struct page * page;


ⓑ 노드를 처음으로 삽입하기에 *p 포인터 변수가 비었으므로 아래 whlile 루프는 수행하지 않고 패스하게 됩니다. 그리고 rb_link_node가 수행됩니다. 이 함수의 수행을 통해 parent_color, left, right가 모두 '0'으로 초기화 됩니다. parent_color를 '0'으로 초기화 시킨다함은 가르키는 부모노드가 없고 이 노드의 색상을 빨간색으로 초기화하겠다는 의미입니다. rb_link_node의 수행이 끝나고 균형을 맞추기 위한 rb_insert_color가 수행되지만 아직 균형을 맞출 노드가 없기에 그냥 패스합니다.


while (*p)
{
    parent = *p;
    page = rb_entry(parent, struct page, rb_page_cache);

    if (offset< page->offset)
        p = &(*p)->rb_left;

    else if (offset > page->offset)

p = &(*p)->rb_right;

    else
       return page;

 }
rb_link_node(node, parent, p);

rb_insert_color(node, &inode->i_rb_page_cache);


ⓒ 그럼 두번째 노드를 삽입해 보도록 하겠습니다. 이번에는 offset 값이 1인 노드를 삽입시켜 보겠습니다. 아래 코드를 거쳐 그림과 같이 구성되는 것을 확인할 수 있습니다.  


struct rb_node ** p = &inode->i_rb_page_cache.rb_node;
struct rb_node * parent = NULL;
struct page * page;


ⓓ 아까 한번의 삽입과정을 통해 *p가 비어있지 않으므로 while루프를 수행하게 됩니다. 포인터 변수 parent는 포인터 변수 p와 같이 노드 안에 있는 struct rb_node의 시작지점을 가르킵니다. rb_entry는 struct rb_node의 시작지점을 가르키는 parent를 이용하여 page구조체의 시작주소를 얻어냅니다. 이것은 offset값에 접근하려고 하는거 아시겠죠? 그리고 얻어낸 offset을 이용하여 기존에 있던 노드의 왼쪽 또는 오른쪽에 삽입할지를 결정합니다. 결정되면 포인터 변수 p에 p의 왼쪽 링크와 오른쪽 링크 주소를 저장하게 하는데 이것은 나중에 rb_link_node 함수 수행을 통해 새로 삽입될 노드의 위치를 지정하기 위한 것 입니다. 즉 트리를 순환하기 위한 변수죠. 루프를 한바퀴 돌고나면 두번째 돌때는 (*p)->left가 '0'이므로 루프를 탈출하게 됩니다. 하지만 아직까지는 새로 삽입할 노드가 연결되지 않았습니다.


while (*p)
{
    parent = *p;
    page = rb_entry(parent, struct page, rb_page_cache);

    if (offset< page->offset)
        p = &(*p)->rb_left;

    else if (offset > page->offset)

p = &(*p)->rb_right;

    else
    return page;
}


ⓔ 계속해서 아래 두 함수를 수행하게 되는데 rb_link_node함수를 통해서 아래와 같은 트리를 구성할 수 있습니다. 드디어 old 노드와 new 노드가 연결된 것을 확인 할 수 있습니다.

rb_link_node(node, parent, p);

rb_insert_color(node, &inode->i_rb_page_cache);


ⓕ 자~ 노드가 두개밖에 안되지만 그래도 완성된 트리입니다.^^ 오른쪽에 삽입하는 것도 비슷하므로 설명은 생략하도록 하겠습니다.. 사실은 그리기가 빡셨습니다 ㅎㅎㅎ


 지금까지 삽입함수를 설명드렸는데 이해가 잘 가셨나요? 저는 설명하면서도 이게 과연 잘 전달이 될지 의문이 들더군요. 혹시 이해가 안가시는 부분이라던가 새로 설명을 원하시는 분은 답글을 달아주시면 친절히 수정하도록 하겠습니다.


 마지막으로 아래의 코드가 레드 블랙 트리의 균형을 맞추는 함수 입니다. 벨런스에 맞게 트리를 재구성하는 함수인데, 자세히 보면 아까 예제를 통해서 봤던 개념들이 그대로 들어가 있습니다. 주석만 보셔서 금방 이해가 가실 듯 합니다.^^


void rb_insert_color(struct rb_node *node, struct rb_root *root)
{
    struct rb_node *parent, *gparent;

    // 부모 노드와 새로 삽입될 노드가 빨강이면 루프를 수행(4번 규칙을 위반함!) 
    while ((parent = rb_parent(node)) && rb_is_red(parent))    
    {
        gparent = rb_parent(parent);

        if (parent == gparent->rb_left)    // 부모 노드가 할아버지 노드의 왼쪽자식일 경우
        {
            {
                register struct rb_node *uncle = gparent->rb_right;
                if (uncle && rb_is_red(uncle))    // 삼촌이 빨간색인 경우 
                {
                    rb_set_black(uncle);
                    rb_set_black(parent);
                    rb_set_red(gparent);
                    node = gparent;
                    continue;
                }
            }
            // 삼촌이 검정색인 경우
            if (parent->rb_right == node)        // 삼촌이 검정색이면서 오른쪽 자식일때
            {
                register struct rb_node *tmp;
                __rb_rotate_left(parent, root);
                tmp = parent;
                parent = node;
                node = tmp;
            }

            rb_set_black(parent);
            rb_set_red(gparent);
            __rb_rotate_right(gparent, root);
        } else {                                    // 부모 노드가 할아버지 노드의 오른쪽 자식일 경우

            {
                register struct rb_node *uncle = gparent->rb_left;
                if (uncle && rb_is_red(uncle))     // 삼촌이 빨간색인 경우  
                {
                    rb_set_black(uncle);
                    rb_set_black(parent);
                    rb_set_red(gparent);
                    node = gparent;
                    continue;
                }
            }

            if (parent->rb_left == node)            // 삼촌이 검정색이면서 왼쪽 자식일때

            {
                register struct rb_node *tmp;
                __rb_rotate_right(parent, root);
                tmp = parent;
                parent = node;
                node = tmp;
            }
            rb_set_black(parent);
            rb_set_red(gparent);
            __rb_rotate_left(gparent, root);
        }
    }
    rb_set_black(root->rb_node);     // 루트 노드는 반드시 검은색이어야 한다.

}


출처 : http://golee07.tistory.com/

//
프로그래밍/C 2013. 4. 19. 00:16

gcc 강좌


2.1 gcc 에 대한 기본 이해
명령행 상태에서 다음과 같이 입력해봅시다. 여러분이 사용하같고 있는 gcc 버전은 알아두고 시작하셔야겠죠?


[yong@redyong yong]$ gcc -v
Reading specs from /usr/lib/gcc-lib/i386-linux/2.7.2.1/specs
gcc version 2.7.2.1
[yong@redyong yong]$ 


gcc -v 이라고 입력하니까 ``Reading specs from..'' 이라같고 말하면서 그 결과값을 ``gcc version 2.7.2.1''이라고 말해주고 있습니다. 자, 어디서 gcc 에 대한 정보를 읽어오는지 봅시다.


/usr/lib/gcc-lib/i386-linux/2.7.2.1/specs


gcc 를 여러분이 소스를 가져다 손수 설치해보신 적은 없을 것입니다. 보통은 바이너리 패키지로 된 것을 가져다 설치하지요. 나중에 정말 휴일에 너무 심심하다 싶으면 gcc 의 소스를 가져와서 컴파일해보십시요. 참, 재미있는 경험이 될 것입니다. 이미 여러분이 갖고 있는 gcc 를 가지고 새로운 gcc 를 컴파일하여 사용합니다. C 컴파일러를 가지고 새 버전의 C 컴파일러를 컴파일하여 사용한다! 이런 재미있는 경험을 또 어디서 해보겠습니까?

gcc 패키지가 어떤 것으로 구성되어 있는지.. gcc 가 제대로 설치되어 있는지 알아보면 좋겠죠? 

다음과 같습니다.


/lib/cpp -----------> /usr/lib/gcc-lib/i386-linux/2.7.2.1/cpp ( 링크임 )
/usr/bin/cc -----------> gcc ( 링크임 )
/usr/bin/gcc C 컴파일러 ``front-end''
/usr/bin/protoize
/usr/bin/unprotoize
/usr/info/cpp.info-*.gz GNU info 시스템을 이용하는 화일들
/usr/info/gcc.info-*.gz 
/usr/lib/gcc-lib


마지막 /usr/lib/gcc-lib 디렉토리에 아래에 gcc 에 관한 모든 내용이 설치됩니다.

보통 다음과 같은 디렉토리 구조를 가집니다.


/usr/lib/gcc-lib/<플랫폼>/< gcc 버전 >


보통 우리는 리눅스를 i386 ( 인텔 환경 )에서 사용하고 있으므로 다음과 같이 나타날 것입니다.


/usr/lib/gcc-lib/i386-linux/2.7.2.1


( i386-linux, i486-linux, i586-linux 는 각기 다를 수 있습니다. 하지만 상관없는 내용입니다. 미친 척 하고 다른 이름을 부여할 수도 있습니다. )

그럼 계속 해서 /usr/lib/gcc-lib 밑의 내용을 살펴보죠.


/usr/lib/gcc-lib/i386-linux/2.7.2.1/cc1
/usr/lib/gcc-lib/i386-linux/2.7.2.1/cpp
/usr/lib/gcc-lib/i386-linux/2.7.2.1/include/*.h
/usr/lib/gcc-lib/i386-linux/2.7.2.1/libgcc.a
/usr/lib/gcc-lib/i386-linux/2.7.2.1/specs


cc1이 진짜 C 컴파일러 본체입니다. gcc 는 단지 적절하게 C 인가, C++ 인가 아니면 오브젝티브 C 인가를 검사하고 컴파일 작업만이 아니라 ``링크''라는 작업까지 하여 C 언어로 프로그램 소스를 만든 다음, 프로그램 바이너리가 만들어지기까지의 모든 과정을 관장해주는 ``조정자'' 역할을 할 뿐입니다.

C 컴파일러는 cc1, C++ 컴파일러는 cc1plus, 오브젝티브 C 컴파일러는 cc1obj 입니다. 여러분이 C++/오브젝티브 C 컴파일러를 설치하셨다면 cc1plus, cc1obj 라는 실행화일도 찾아보실 수 있을 겁니다. cpp 는 "프리프로세서"입니다. #include 등의 문장을 본격적인 cc1 컴파일에 들어 가기에 앞서 먼저(pre) 처리(process)해주는 녀석입니다.

참고로 g++ 즉 C++ 컴파일러( 정확히는 C++ 컴파일러 프론트 엔드 )에 대한 패키지는 다음과 같습니다.


/usr/bin/c++ ---------------------------> g++ 에 대한 링크에 불과함
/usr/bin/g++
/usr/lib/gcc-lib/i386-linux/2.7.2.1/cc1plus ( 진짜 C++ 컴파일러 )


오브젝티브 C 컴파일러 패키지는 다음과 같습니다.


/usr/lib/gcc-lib/i386-linux/2.7.2.1/cc1obj
/usr/lib/gcc-lib/i386-linux/2.7.2.1/include/objc/*.h
/usr/lib/gcc-lib/i386-linux/2.7.2.1/libobjc.a


구성요소가 어떤 것인지 아셨으니 좀 도움이 되셨을 겁니다.

2.2 gcc 사용하기
hello.c 라는 지긋지긋한 소스 하나를 기준으로 설명합니다 ^^


--------------------------------------------------------------------------------

#include 

int
main ( void )
{
(void) printf ( "Hello, Linux Girls! =)\n" );
return 0;
}


--------------------------------------------------------------------------------


참고로 제일 간단한 소스는 다음과 같은 것입니다. ^^


--------------------------------------------------------------------------------

main () {}


--------------------------------------------------------------------------------


컴파일을 해보겠습니다! $ 는 프롬프트이지 입력하는 것이 아닌 것 아시죠?


$ gcc hello.c
$


무소식이 희소식이라... gcc 이렇게 실행하고 나서 아무런 메시지도 나오지 않고 다음 줄에 프롬프트만 달랑 떨어지면 그것이 바로 컴파일 성공입니다.

여러분은 무심코 다음과 같이 결과 프로그램을 실행시키려 할 것입니다.


$ hello
bash: hello: command not found
$


예. 땡입니다. ^^

여러분은 다음과 같이 실행시켜야 합니다.


$ ./a.out


맨 앞의 도트 문자(.)는 현재 디렉토리를 의미합니다. 그 다음 디렉토리 구분 문자 슬래쉬(/)를 쓰고 유닉스 C 에서 ``약속한'' C 컴파일러의 출력 결과 바이너리 화일인 a.out 을 써줍니다.

이러한 습관은 아주 중요합니다. 여러분이 현재 디렉토리에 어떤 실행 화일을 만들고 나서 테스트를 해 보려고 한다면 꼭 ./<실행 화일명> 이라고 적어줍니다.

유닉스는 기본적으로 PATH 라는 환경변수에 있는 디렉토리에서만 실행화일을 찾을 뿐입니다. 만약 PATH 라는 환경변수에 현재 디렉토리를 의미하는 도트 문자(.)가 들어있지 않으면 현재 디렉토리의 실행화일은 절대 실행되지 않습니다. 게다가 현재 디렉토리를 PATH 환경 변수에 넣어준다 할 지라도 도스처렁럼 현재 디렉토리를 먼저 찾는다든지 하는 일은 없습니다. 오로지 PATH 에 지정한 순서대로 수행합니다.

실행 바이너리명이 계속 a.out 으로 나오면 좀 곤란하죠. 뭐 물론 mv 명령으로 a.out 의 이름을 바꾸면 되지만서도...


-o 옵션


-o 옵션( 소문자 o 임! )은 출력(output) 화일명을 정하는 옵션입니다. 위에서 우리는 hello.c 라는 소스를 가지고 일반적으로 hello 라는 이름의 실행화일을 만들고 싶어할 것입니다.


$ gcc -o hello hello.c
^^^^^^^^


또는 다음과 같이 순서를 바꿔도 무방합니다.


$ gcc hello.c -o hello
^^^^^^^^


워낙 유닉스 쪽은 명령행 방식이 전통적으로 주된 방식이라 명령행에서 하는 일은 뛰어납니다.

당연히 실행을 하려면 ./hello 라고 하셔야 합니다. 결과는 다음처럼 나오겠지요?


$ ./hello
Hello, Linux Girls! =)
$


주의
제일 안좋은 습관 중 하나가 바로 테스트용으로 만든 소스라고 다음처럼 하는 것입니다.


$ gcc -o test test.c
$ test
$


문제를 알아내기 위하여 위에서 작성한 hello.c 를 컴파일/링크해봅시다.


$ gcc -o test hello.c
$ test
$


원하는 문자열이 출력되지 않았습니다. -.-


$ ./test
Hello, Linux Girls! =)
$


-c 옵션


어떤 이유로 오로지 컴파일(compile) 작업만 하고 싶은 경우가 있습니다. 그럴 때는 다음과 같이 합니다.


$ gcc -c hello.c
$


그 결과 만들어지는 화일은 전통적으로 hello.c 에서 .c 부분을 떼어내고 .o 를 붙인 화일입니다. 오브젝트 화일, 목적 화일이라고 하지요.

hello.o 라는 화일이 만들어집니다.

여러분은 C 언어로 조금이라도 복잡한 프로그램을 만들기 시작하면 여러 개의 소스로 나누어서 전체 프로그램을 짜게 됩니다. 그럴 때는 각 소스가 전체 기능에 기여하는 특정 기능의 함수들을 가지게 되고 오로지 한 녀석만 main 함수를 가집니다.

만약 어떤 프로그램이 foo.c, bar.c 이렇게 두 개의 소스로 이루어져 있다고 합시다. 이럴 때는 다음과 같이 하는 것이 가능합니다.


방법(1)

$ gcc -o baz foo.c bar.c
$ ./baz


방법(2)

$ gcc -c foo.c
$ gcc -c bar.c

또는

$ gcc -c foo.c bar.c
$ gcc -o baz foo.o bar.o
^^^^^^^^^^^
$ ./baz


위에서 보면 "아니! C 컴파일러에 .c 즉 소스 화일이 아닌 오브젝트 화일도 막 써주나?"라는 생각을 하시게 될 겁니다.

그렇습니다! 왜냐? gcc 는 정확히 말해서 C 컴파일러가 아닙니다. gcc 라는 실행 화일 자체는 "C 컴파일러를 돌리는 녀석"입니다.

더욱 더 정확히 말해보겠습니다.

C 언어는 기본적으로 두 가지 과정을 거쳐야만 실행화일을 만들어냅니다.


컴파일 ( .c -------> .o ) 
링크 ( .o -------> 실행화일 a.out ) 

1. 과정을 실제로 맡는 것은 cc1 이라는 녀석이고 2. 과정을 맡는 것은 ld 라는 링커(linker)입니다.

gcc 는 상당히 편리한 도구로서 .c, .o 등의 화일명 꼬리말을 보고 적절하게 C 컴파일러와 링커를 불러다가 원하는 실행화일을 만들어줍니다. gcc 는 "컴파일러와 링커를 불러주는 대리인"입니다.

hello.c 를 괜히 어렵게 컴파일/링크해봅시다 ^^


$ gcc -c hello.c
^^^^^^^
$ gcc -o hello hello.o
^^^^^^^


gcc 가 얼마나 똑똑피한 놈인지 알아보죠.


$ gcc -c hello.o


이게 무슨 의미가 있겠습니까? ^^


gcc: hello.o: linker input file unused since linking not done


위와 같이 불평합니다. 링크 과정을 수행하지 않으므로 링커에 대한 입력 화일인 hello.o 를 사용하지 않았다!


-I 옵션


#include 문장에서 지정한 헤더 화일이 들어있는 곳을 정하는 옵션입니다. 아주 많이 사용되는 옵션 중 하나입니다.


--------------------------------------------------------------------------------

#include 
#include "my_header.h"


--------------------------------------------------------------------------------


전자( <> 문자를 쓴 경우 )는 시스템 표준 헤더 디렉토리인 /usr/include를 기준으로 화일을 찾아서 포함시킵니다. 표준 디렉토리이지요.

후자( "" 문자를 쓴 경우 )는 지금 컴파일러가 실행되고 있는 현재 디렉토리를 기준으로 헤더 화일을 찾습니다.

이 두 디렉토리가 아닌 곳에 대해서는 명시적으로 -I<디렉토리> 로 정해줍니다.


$ gcc -c myprog1.c -I..
$ gcc -c myprog1.c -Iinclude


첫번째는 헤더 화일이 현재 소스 하위 디렉토리(..)에 있다는 뜻이며 두번째는 현재 디렉토리의 include라는 디렉토리에 들어있다는 뜻입니다.

-I 옵션은 얼마든지 여러번 쓸 수 있으며 주어진 순서대로 헤더 화일을 검색합니다.


주의
디렉토리명은 -I 라는 문자 바로 다음에 붙여서 씁니다. 즉 -I <디렉토리>라는 식이 아니라 -I<디렉토리> 입니다. 또한 유닉스에 있어 표준 헤더 화일 디렉토리는 /usr/include 라는 사실을 기억하시기 바랍니다. 또한 리눅스에 있어서는 커널 소스가 아주 중요한데 리눅스 고유의 기능을 쓰는 리눅스용 프로그램의 경우에는 /usr/include/linux, /usr/include/asm, /usr/include/scsi (최신 커널의 경우) 라는 디렉토리가 꼭 있어야 하며 각각은 커널 소스의 헤더 디렉토리에 대한 링크입니다. 따라서 커널 소스를 꼭 설치해두셔야 합니다.


/usr/include/linux --------------> /usr/src/linux/include/linux
/usr/include/asm --------------> /usr/src/linux/include/asm 
/usr/include/scsi --------------> /usr/src/linux/include/scsi


( 위에서 /usr/src/linux/include/asm은 사실 대부분의 경우 /usr/src/linux/include/asm-i386 이라는 디렉토리에 대한 링크입니다 )

각각 linux는 일반적인 C 헤더 화일, asm은 각 아키텍쳐별 의존적인 어셈블리 헤더 화일, 맨 마지막은 SCSI 장치 프로그래밍에 쓰이는 헤더 화일이 들어있는 곳입니다.

일반적으로 커널 소스( 약 6 메가 이상되는 소스 )는 /usr/src 에서 tar, gzip으로 풀어두는 것이 관례입니다.

맨 처음 프로그래밍을 할 때는 그렇게 많이 쓰지는 않는 옵션이지만 여러분이 다른 소스를 가져다 컴파일할 때 아주 많이 보게 되는 옵션이므로 일단 이해는 할 수 있어야겠죠?


-l 옵션과 -L 옵션


옵션을 제대로 이해하기에 앞서 ``라이브러리''라는 것에 대한 이야기를 먼 저 하지 않으면 안될 듯 하군요.


라이브러리 


--------------------------------------------------------------------------------

``라이브러리(Library)''라는 것은 개념상 영어 단어 그대로입니다.
무엇인가 유용한 지식을 한 곳에 모아둔 곳이라는 개념이지요.

C 프로그래밍을 하다 보면 반복적으로 사용하게 되는 함수들이 있기
마련이고 그것은 하나의 함수로 떼내어 어디에서든 유용하게 사용할
수 있도록 합니다.

이 함수가 극도로 많이 사용되는 경우에는 ``라이브러리''라는 것으
로 만들어두고 매번 컴파일해둘 필요없이 가져다 사용할 수 있도록
하지요.

라이브러리에 대한 얘기는 다음 번에 또 하게 되겠지만 일단 지금
필요한 지식만 쌓기로 하겠습니다.

일반적으로 관례상 라이브러리는 화일명 끝이 .a 로 끝납니다.
여기서 a 는 Archive 라는 의미일 것입니다.

라이브러리의 예를 들어보도록 하죠. 지금 /usr/lib 디렉토리를 한
번 구경해보십시요. 정말로 많은 라이브러리들이 있지요.

libc.a
libm.a
libdb.a
libelf.a
libfl.a
libg++.a
libg.a
libncurses.a
libreadline.a
libvga.a
등등...

이러한 라이브러리는 우리가 컴파일 과정을 거쳐서 만든 .o 화일을
한 곳에 통들어 관리하는 것에 불과합니다. 따라서 archive 를 의미
하는 .a 라고 이름을 짓게 된 것이죠. 라이브러리는 ``도서관''으로
서 그냥 .o 를 무작위로 집어넣은 것은 아니고 당연히 도서관에는
소장하고 있는 책에 대한 목록(index)을 가지듯 포함되어 있는 .o
에 대한 인덱스(index)를 가지고 있습니다.

라이브러리는 다음과 같이 구성되어 있다고 할 수 있는 것입니다.

라이브러리 = 목차(index) + ( a.o + b.o + c.o + ... )

libc.a 를 가지고 한 번 놀아볼까요? 라이브러리 아카이브를 관리하
는 ar 이라는 GNU 유틸리티를 써보겠습니다.

$ cd /usr/lib
$ ar t libc.a
assert-perr.o
assert.o
setenv.o
ftime.o
psignal.o
mkstemp.o
sigint.o
realpath.o
cvt.o
gcvt.o
ctype-extn.o
ctype.o
<등등... 계속>

$ ar t libc.a | grep printf
iofprintf.o
ioprintf.o
iosprintf.o
iovsprintf.o
iovfprintf.o
printf_fp.o
vprintf.o
snprintf.o
vsnprintf.o
asprintf.o
vasprintf.o
printf-prs.o
reg-printf.o
$

위에서 볼 수 있다시피 .o 화일들이 그 안에 들어있습니다.

<주목>
유닉스에서 라이브러리 이름은 lib 로 시작합니다.


--------------------------------------------------------------------------------


간단하게 라이브러리를 하나 만들어서 사용해보도록 합시다.

이번 예제는 3 개의 화일로 이루어졌습니다.


myfunc.h
myfunc.c
hello.c


첫번째 myfunc.h 헤더 화일의 내용입니다.


--------------------------------------------------------------------------------

extern void say_hello ( void );


--------------------------------------------------------------------------------


두번째 myfunc.c, 실제 함수 정의부입니다.


--------------------------------------------------------------------------------

#include 
#include "myfunc.h"

void 
say_hello ( void )
{
printf ( "Hello, Linux guys!\n" );
}


--------------------------------------------------------------------------------


마지막으로 메인 함수(main)가 들어있는 hello.c 입니다.


--------------------------------------------------------------------------------

#include "myfunc.h"

int
main ( void )
{
say_hello ();
return 0;
}


--------------------------------------------------------------------------------


main 함수에서 say_hello 라는 함수를 사용하게 됩니다. 이 정도야 그냥 이렇게 해버리고 말죠 ^^


$ gcc -o say_linux hello.c myfunc.c


하지만 라이브러리를 만들어보고 시험해보려고 하는 것이므로 일부러 어렵게 한 번 해보기로 하겠습니다.


$ gcc -c myfunc.c
$ ar r libmylib.a myfunc.o
$ ar s libmylib.a
$ ar t libmylib.a
myfunc.o
$ gcc -o say_linux hello.c -lmylib
^^^^^^^^
ld: cannot open -lmylib: No such file or directory


흠... 처음부터 만만치 않죠? ^^ 실패하긴 했지만 몇 가지를 일단 알아봅시다.


-l 옵션
링크(link)할 라이브러리를 명시해주는 옵션이 바로 -l ( 소문자 L ) 옵션입니다.

-I 옵션과 마찬가지로 바짝 붙여서 씁니다. 절대 떼면 안됩니다.

우리는 libmylib.a 라는 라이브러리를 만들어두었습니다. 그것을 사용하기 위해서는 -lmylib 라고 적어줍니다. 라이브러리 화일명에서 어떤 글자들을 떼내고 쓰는지 주목하십시요.


libmylib.a
^^^^^ 


앞의 lib 를 떼내고 맨 뒤에 붙는 .a 를 떼냅니다.

링크(link)라는 것이 어떤 것이 모르신다면 당장 C 프로그래밍 책을 다시 읽어보시기 바랍니다. 이 글에서 설명할 범위는 아닌 듯 합니다.


-L 옵션
ld 는 유닉스에서 사용되는 링커(Linker)입니다. C 프로그램 컴파일의 맨 마지막 단계를 맡게 되지요.

위에서 우리는 다음과 같은 에러 메세지를 만났습니다.


ld: cannot open -lmylib: No such file or directory


자, 이제 배워야 할 옵션은 ``라이브러리의 위치를 정해주는'' -L ( 대문자 L ) 옵션입니다. 사용형식은 -L<디렉토리명> 입니다.

리눅스에서 어떤 라이브러리를 찾을 때는 /lib, /usr/lib, /usr/local/lib와 같은 정해진 장소에서만 찾게 되어 있습니다. 그것은 규칙이지요.

중요한 사실은 아무리 여러분 라이브러리를 현재 작업 디렉토리에 놓아두어도 ld 는 그것을 찾지 않는다는 사실입니다. ld 더러 라이브러리가 있는 장소를 알려주려면 다음과 같이 -L 옵션을 붙이십시요.


$ gcc -o say_linux hello.c -lmylib -L.
^^^


-L. 은 현재 디렉토리에서 라이브러리를 찾으라는 말입니다. -L 옵션은 여러번 줄 수 있습니다.

성공적으로 컴파일되었을 겁니다.


$ ./say_linux
Hello, Linux guys!


지금까지 여러분은 gcc 옵션 중 두번째로 중요한 -I, -l, -L 옵션에 대하여 배우셨습니다. 그리고 또한 라이브러리 만들기에 대하여 맛보기를 하였습니다.

//
프로그래밍/C 2013. 4. 19. 00:15

syntax on                   :     구문 강조
set number                 :     줄번호
set ai                        :      자동행

set background=dark     :     바탕이 흑백일 경우 더 잘 보이게 한다
set si                        :      if문 다음에 자동으로 맞추어주기
set tabstop=4             :      텝키의 간격을 4로
set shiftwidth=4          :      들여쓰기 간격을 4로
set autoindent             :      자동들여쓰기 
set cindent                 :      C언어 자동들여쓰기 
set nobackup              :      백업을 만들지 않는다
set ruler                    :      격자(좌표) 
set encoding=utf-8       :      utf-8 로 인코딩
set fencs=utf-8,cp949  :      fileencoding과 같음. utf-8, cp949방식 파일을 모두 열수있음. 저장시엔 utf-8
set visualbell              :      삑소리 안나게 하기
set nowrap                 :      줄 넘기지 말기
set term=xterm-color
cmap W w                 :       W나 w나 같은 의미

home 디렉토리의 .vimrc 파일에서 설정하면 된다


//
프로그래밍/C 2013. 4. 19. 00:13

회사에서 C언어와 자료구조에 대한 강의를 보내주게 되어서 듣게 되었는데,

강의 내용이 기본적인 내용들이라 블로깅을 정리하는 시간을 가져 보았습니다.ㅎㅎ

그렇다구 수업시간과 전혀 상관없는 딴짓은 아니구요^^;

수업과 상관있는 실제로 쓰이고 있는 자료구조가 오늘의 주제 입니다.


평소에 후배들이 저에게 질문하는 것이 있는데,

"과연 지금 학교에서 배우고 있는 것들이 현업에서 어떻게 쓰이는지 모르겠다.." 라는 것 입니다.

학교에서 학부생때 배우는 과정들은 실제로 현업에서 아주 중요한 기본(Base)가 된다는 것임을 알려드리고 싶습니다.

제가 아직 회사에서도 신입이기에 후배들에게 현업이 이렇다 저렇다라고는 감히(?) 말하기 애매하기에

저의 주관이 아닌 linux kernel code를 빌려서 이야기 하도록 하겠습니다.


아래는 linux kernel의 최신버전인 3.3의 Source중 일부 입니다.

리눅스 커널 최신 소스는 www.kernel.org 에서 받을 수 있으며 최근에 들어 빠른 속도로 stable 버전이 올라오고 있죠.

정말 오픈소스의 위력을 잘 느끼고 있습니다. ㅎㅎㅎ

이렇게 리눅스 커널 소스는 모든 사람들에게 공개되어 있으므로 공부하기에 가장 좋은 자료가 아닐까 합니다.


그럼 오늘의 주제는 실제로 쓰이고 있는 자료구조이기에 수 많은 커널 소스중에서 일부를 보도록 하겠습니다.


아래는 linux-3.3.3\linux-3.3.3\include\linux\list.h 의 내용입니다.


1
2
3
4
5
6
7
8
9
10
11
12
13
14
15
16
17
18
19
20
21
22
23
24
25
26
27
28
29
30
31
32
33
34
35
36
37
38
39
40
41
42
43
44
45
46
47
48
49
50
51
52
53
54
55
56
57
58
59
60
61
62
63
64
65
66
67
68
69
70
71
72
73
74
75
76
77
78
79
80
81
82
83
84
85
86
87
88
89
90
91
92
93
94
95
96
97
98
99
100
101
102
103
104
105
106
107
108
109
110
111
112
113
114
115
116
117
118
119
120
121
122
123
124
125
126
127
128
129
130
131
132
133
134
135
136
137
138
139
140
141
142
143
144
145
146
147
148
149
150
151
152
153
154
155
156
157
158
159
160
161
162
163
164
165
166
167
168
169
170
171
172
173
174
175
176
177
178
179
180
181
182
183
184
185
186
187
188
189
190
191
192
193
194
195
196
197
198
199
200
201
202
203
204
205
206
207
208
209
210
211
212
213
214
215
216
217
218
219
220
221
222
223
224
225
226
227
228
229
230
231
232
233
234
235
236
237
238
239
240
241
242
243
244
245
246
247
248
249
250
251
252
253
254
255
256
257
258
259
260
261
262
263
264
265
266
267
268
269
270
271
272
273
274
275
276
277
278
279
280
281
282
283
284
285
286
287
288
289
290
291
292
293
294
295
296
297
298
299
300
301
302
303
304
305
306
307
308
309
310
311
312
313
314
315
316
317
318
319
320
321
322
323
324
325
326
327
328
329
330
331
332
333
334
335
336
337
338
339
340
341
342
343
344
345
346
347
348
349
350
351
352
353
354
355
356
357
358
359
360
361
362
363
364
365
366
367
368
369
370
371
372
373
374
375
376
377
378
379
380
381
382
383
384
385
386
387
388
389
390
391
392
393
394
395
396
397
398
399
400
401
402
403
404
405
406
407
408
409
410
411
412
413
414
415
416
417
418
419
420
421
422
423
424
425
426
427
428
429
430
431
432
433
434
435
436
437
438
439
440
441
442
443
444
445
446
447
448
449
450
451
452
453
454
455
456
457
458
459
460
461
462
463
464
465
466
467
468
469
470
471
472
473
474
475
476
477
478
479
480
481
482
483
484
485
486
487
488
489
490
491
492
493
494
495
496
497
498
499
500
501
502
503
504
505
506
507
508
509
510
511
512
513
514
515
516
517
518
519
520
521
522
523
524
525
526
527
528
529
530
531
532
533
534
535
536
537
538
539
540
541
542
543
544
545
546
547
548
549
550
551
552
553
554
555
556
557
558
559
560
561
562
563
564
565
566
567
568
569
570
571
572
573
574
575
576
577
578
579
580
581
582
583
584
585
586
587
588
589
590
591
592
593
594
595
596
597
598
599
600
601
602
603
604
605
606
607
608
609
610
611
612
613
614
615
616
617
618
619
620
621
622
623
624
625
626
627
628
629
630
631
632
633
634
635
636
637
638
639
640
641
642
643
644
645
646
647
648
649
650
651
652
653
654
655
656
657
658
659
660
661
662
663
664
665
666
667
668
669
670
671
672
673
674
675
676
677
678
679
680
681
682
683
684
685
686
687
688
689
690
691
692
693
694
695
696
697
698
699
700
701
702
703
704
705
706
707
708
709
710
711
712
713
714
715
716
717
#ifndef _LINUX_LIST_H
#define _LINUX_LIST_H
 
#include <LINUX types.h>
#include <LINUX stddef.h>
#include <LINUX poison.h>
#include <LINUX const.h>
 
/*
 * Simple doubly linked list implementation.
 *
 * Some of the internal functions ("__xxx") are useful when
 * manipulating whole lists rather than single entries, as
 * sometimes we already know the next/prev entries and we can
 * generate better code by using them directly rather than
 * using the generic single-entry routines.
 */
 
#define LIST_HEAD_INIT(name) { &(name), &(name) }
 
#define LIST_HEAD(name) \
    struct list_head name = LIST_HEAD_INIT(name)
 
static inline void INIT_LIST_HEAD(struct list_head *list)
{
    list->next = list;
    list->prev = list;
}
 
/*
 * Insert a new entry between two known consecutive entries.
 *
 * This is only for internal list manipulation where we know
 * the prev/next entries already!
 */
#ifndef CONFIG_DEBUG_LIST
static inline void __list_add(struct list_head *new,
                  struct list_head *prev,
                  struct list_head *next)
{
    next->prev = new;
    new->next = next;
    new->prev = prev;
    prev->next = new;
}
#else
extern void __list_add(struct list_head *new,
                  struct list_head *prev,
                  struct list_head *next);
#endif
 
/**
 * list_add - add a new entry
 * @new: new entry to be added
 * @head: list head to add it after
 *
 * Insert a new entry after the specified head.
 * This is good for implementing stacks.
 */
static inline void list_add(struct list_head *new, struct list_head *head)
{
    __list_add(new, head, head->next);
}
 
 
/**
 * list_add_tail - add a new entry
 * @new: new entry to be added
 * @head: list head to add it before
 *
 * Insert a new entry before the specified head.
 * This is useful for implementing queues.
 */
static inline void list_add_tail(struct list_head *new, struct list_head *head)
{
    __list_add(new, head->prev, head);
}
 
/*
 * Delete a list entry by making the prev/next entries
 * point to each other.
 *
 * This is only for internal list manipulation where we know
 * the prev/next entries already!
 */
static inline void __list_del(struct list_head * prev, struct list_head * next)
{
    next->prev = prev;
    prev->next = next;
}
 
/**
 * list_del - deletes entry from list.
 * @entry: the element to delete from the list.
 * Note: list_empty() on entry does not return true after this, the entry is
 * in an undefined state.
 */
#ifndef CONFIG_DEBUG_LIST
static inline void __list_del_entry(struct list_head *entry)
{
    __list_del(entry->prev, entry->next);
}
 
static inline void list_del(struct list_head *entry)
{
    __list_del(entry->prev, entry->next);
    entry->next = LIST_POISON1;
    entry->prev = LIST_POISON2;
}
#else
extern void __list_del_entry(struct list_head *entry);
extern void list_del(struct list_head *entry);
#endif
 
/**
 * list_replace - replace old entry by new one
 * @old : the element to be replaced
 * @new : the new element to insert
 *
 * If @old was empty, it will be overwritten.
 */
static inline void list_replace(struct list_head *old,
                struct list_head *new)
{
    new->next = old->next;
    new->next->prev = new;
    new->prev = old->prev;
    new->prev->next = new;
}
 
static inline void list_replace_init(struct list_head *old,
                    struct list_head *new)
{
    list_replace(old, new);
    INIT_LIST_HEAD(old);
}
 
/**
 * list_del_init - deletes entry from list and reinitialize it.
 * @entry: the element to delete from the list.
 */
static inline void list_del_init(struct list_head *entry)
{
    __list_del_entry(entry);
    INIT_LIST_HEAD(entry);
}
 
/**
 * list_move - delete from one list and add as another's head
 * @list: the entry to move
 * @head: the head that will precede our entry
 */
static inline void list_move(struct list_head *list, struct list_head *head)
{
    __list_del_entry(list);
    list_add(list, head);
}
 
/**
 * list_move_tail - delete from one list and add as another's tail
 * @list: the entry to move
 * @head: the head that will follow our entry
 */
static inline void list_move_tail(struct list_head *list,
                  struct list_head *head)
{
    __list_del_entry(list);
    list_add_tail(list, head);
}
 
/**
 * list_is_last - tests whether @list is the last entry in list @head
 * @list: the entry to test
 * @head: the head of the list
 */
static inline int list_is_last(const struct list_head *list,
                const struct list_head *head)
{
    return list->next == head;
}
 
/**
 * list_empty - tests whether a list is empty
 * @head: the list to test.
 */
static inline int list_empty(const struct list_head *head)
{
    return head->next == head;
}
 
/**
 * list_empty_careful - tests whether a list is empty and not being modified
 * @head: the list to test
 *
 * Description:
 * tests whether a list is empty _and_ checks that no other CPU might be
 * in the process of modifying either member (next or prev)
 *
 * NOTE: using list_empty_careful() without synchronization
 * can only be safe if the only activity that can happen
 * to the list entry is list_del_init(). Eg. it cannot be used
 * if another CPU could re-list_add() it.
 */
static inline int list_empty_careful(const struct list_head *head)
{
    struct list_head *next = head->next;
    return (next == head) && (next == head->prev);
}
 
/**
 * list_rotate_left - rotate the list to the left
 * @head: the head of the list
 */
static inline void list_rotate_left(struct list_head *head)
{
    struct list_head *first;
 
    if (!list_empty(head)) {
        first = head->next;
        list_move_tail(first, head);
    }
}
 
/**
 * list_is_singular - tests whether a list has just one entry.
 * @head: the list to test.
 */
static inline int list_is_singular(const struct list_head *head)
{
    return !list_empty(head) && (head->next == head->prev);
}
 
static inline void __list_cut_position(struct list_head *list,
        struct list_head *head, struct list_head *entry)
{
    struct list_head *new_first = entry->next;
    list->next = head->next;
    list->next->prev = list;
    list->prev = entry;
    entry->next = list;
    head->next = new_first;
    new_first->prev = head;
}
 
/**
 * list_cut_position - cut a list into two
 * @list: a new list to add all removed entries
 * @head: a list with entries
 * @entry: an entry within head, could be the head itself
 *  and if so we won't cut the list
 *
 * This helper moves the initial part of @head, up to and
 * including @entry, from @head to @list. You should
 * pass on @entry an element you know is on @head. @list
 * should be an empty list or a list you do not care about
 * losing its data.
 *
 */
static inline void list_cut_position(struct list_head *list,
        struct list_head *head, struct list_head *entry)
{
    if (list_empty(head))
        return;
    if (list_is_singular(head) &&
        (head->next != entry && head != entry))
        return;
    if (entry == head)
        INIT_LIST_HEAD(list);
    else
        __list_cut_position(list, head, entry);
}
 
static inline void __list_splice(const struct list_head *list,
                 struct list_head *prev,
                 struct list_head *next)
{
    struct list_head *first = list->next;
    struct list_head *last = list->prev;
 
    first->prev = prev;
    prev->next = first;
 
    last->next = next;
    next->prev = last;
}
 
/**
 * list_splice - join two lists, this is designed for stacks
 * @list: the new list to add.
 * @head: the place to add it in the first list.
 */
static inline void list_splice(const struct list_head *list,
                struct list_head *head)
{
    if (!list_empty(list))
        __list_splice(list, head, head->next);
}
 
/**
 * list_splice_tail - join two lists, each list being a queue
 * @list: the new list to add.
 * @head: the place to add it in the first list.
 */
static inline void list_splice_tail(struct list_head *list,
                struct list_head *head)
{
    if (!list_empty(list))
        __list_splice(list, head->prev, head);
}
 
/**
 * list_splice_init - join two lists and reinitialise the emptied list.
 * @list: the new list to add.
 * @head: the place to add it in the first list.
 *
 * The list at @list is reinitialised
 */
static inline void list_splice_init(struct list_head *list,
                    struct list_head *head)
{
    if (!list_empty(list)) {
        __list_splice(list, head, head->next);
        INIT_LIST_HEAD(list);
    }
}
 
/**
 * list_splice_tail_init - join two lists and reinitialise the emptied list
 * @list: the new list to add.
 * @head: the place to add it in the first list.
 *
 * Each of the lists is a queue.
 * The list at @list is reinitialised
 */
static inline void list_splice_tail_init(struct list_head *list,
                     struct list_head *head)
{
    if (!list_empty(list)) {
        __list_splice(list, head->prev, head);
        INIT_LIST_HEAD(list);
    }
}
 
/**
 * list_entry - get the struct for this entry
 * @ptr:    the &struct list_head pointer.
 * @type:   the type of the struct this is embedded in.
 * @member: the name of the list_struct within the struct.
 */
#define list_entry(ptr, type, member) \
    container_of(ptr, type, member)
 
/**
 * list_first_entry - get the first element from a list
 * @ptr:    the list head to take the element from.
 * @type:   the type of the struct this is embedded in.
 * @member: the name of the list_struct within the struct.
 *
 * Note, that list is expected to be not empty.
 */
#define list_first_entry(ptr, type, member) \
    list_entry((ptr)->next, type, member)
 
/**
 * list_for_each    -   iterate over a list
 * @pos:    the &struct list_head to use as a loop cursor.
 * @head:   the head for your list.
 */
#define list_for_each(pos, head) \
    for (pos = (head)->next; pos != (head); pos = pos->next)
 
/**
 * __list_for_each  -   iterate over a list
 * @pos:    the &struct list_head to use as a loop cursor.
 * @head:   the head for your list.
 *
 * This variant doesn't differ from list_for_each() any more.
 * We don't do prefetching in either case.
 */
#define __list_for_each(pos, head) \
    for (pos = (head)->next; pos != (head); pos = pos->next)
 
/**
 * list_for_each_prev   -   iterate over a list backwards
 * @pos:    the &struct list_head to use as a loop cursor.
 * @head:   the head for your list.
 */
#define list_for_each_prev(pos, head) \
    for (pos = (head)->prev; pos != (head); pos = pos->prev)
 
/**
 * list_for_each_safe - iterate over a list safe against removal of list entry
 * @pos:    the &struct list_head to use as a loop cursor.
 * @n:      another &struct list_head to use as temporary storage
 * @head:   the head for your list.
 */
#define list_for_each_safe(pos, n, head) \
    for (pos = (head)->next, n = pos->next; pos != (head); \
        pos = n, n = pos->next)
 
/**
 * list_for_each_prev_safe - iterate over a list backwards safe against removal of list entry
 * @pos:    the &struct list_head to use as a loop cursor.
 * @n:      another &struct list_head to use as temporary storage
 * @head:   the head for your list.
 */
#define list_for_each_prev_safe(pos, n, head) \
    for (pos = (head)->prev, n = pos->prev; \
         pos != (head); \
         pos = n, n = pos->prev)
 
/**
 * list_for_each_entry  -   iterate over list of given type
 * @pos:    the type * to use as a loop cursor.
 * @head:   the head for your list.
 * @member: the name of the list_struct within the struct.
 */
#define list_for_each_entry(pos, head, member)              \
    for (pos = list_entry((head)->next, typeof(*pos), member);   \
         &pos->member != (head);     \
         pos = list_entry(pos->member.next, typeof(*pos), member))
 
/**
 * list_for_each_entry_reverse - iterate backwards over list of given type.
 * @pos:    the type * to use as a loop cursor.
 * @head:   the head for your list.
 * @member: the name of the list_struct within the struct.
 */
#define list_for_each_entry_reverse(pos, head, member)          \
    for (pos = list_entry((head)->prev, typeof(*pos), member);   \
         &pos->member != (head);     \
         pos = list_entry(pos->member.prev, typeof(*pos), member))
 
/**
 * list_prepare_entry - prepare a pos entry for use in list_for_each_entry_continue()
 * @pos:    the type * to use as a start point
 * @head:   the head of the list
 * @member: the name of the list_struct within the struct.
 *
 * Prepares a pos entry for use as a start point in list_for_each_entry_continue().
 */
#define list_prepare_entry(pos, head, member) \
    ((pos) ? : list_entry(head, typeof(*pos), member))
 
/**
 * list_for_each_entry_continue - continue iteration over list of given type
 * @pos:    the type * to use as a loop cursor.
 * @head:   the head for your list.
 * @member: the name of the list_struct within the struct.
 *
 * Continue to iterate over list of given type, continuing after
 * the current position.
 */
#define list_for_each_entry_continue(pos, head, member)         \
    for (pos = list_entry(pos->member.next, typeof(*pos), member);   \
         &pos->member != (head); \
         pos = list_entry(pos->member.next, typeof(*pos), member))
 
/**
 * list_for_each_entry_continue_reverse - iterate backwards from the given point
 * @pos:    the type * to use as a loop cursor.
 * @head:   the head for your list.
 * @member: the name of the list_struct within the struct.
 *
 * Start to iterate over list of given type backwards, continuing after
 * the current position.
 */
#define list_for_each_entry_continue_reverse(pos, head, member)     \
    for (pos = list_entry(pos->member.prev, typeof(*pos), member);   \
         &pos->member != (head); \
         pos = list_entry(pos->member.prev, typeof(*pos), member))
 
/**
 * list_for_each_entry_from - iterate over list of given type from the current point
 * @pos:    the type * to use as a loop cursor.
 * @head:   the head for your list.
 * @member: the name of the list_struct within the struct.
 *
 * Iterate over list of given type, continuing from current position.
 */
#define list_for_each_entry_from(pos, head, member)             \
    for (; &pos->member != (head);   \
         pos = list_entry(pos->member.next, typeof(*pos), member))
 
/**
 * list_for_each_entry_safe - iterate over list of given type safe against removal of list entry
 * @pos:    the type * to use as a loop cursor.
 * @n:      another type * to use as temporary storage
 * @head:   the head for your list.
 * @member: the name of the list_struct within the struct.
 */
#define list_for_each_entry_safe(pos, n, head, member)          \
    for (pos = list_entry((head)->next, typeof(*pos), member),   \
        n = list_entry(pos->member.next, typeof(*pos), member);  \
         &pos->member != (head);                     \
         pos = n, n = list_entry(n->member.next, typeof(*n), member))
 
/**
 * list_for_each_entry_safe_continue - continue list iteration safe against removal
 * @pos:    the type * to use as a loop cursor.
 * @n:      another type * to use as temporary storage
 * @head:   the head for your list.
 * @member: the name of the list_struct within the struct.
 *
 * Iterate over list of given type, continuing after current point,
 * safe against removal of list entry.
 */
#define list_for_each_entry_safe_continue(pos, n, head, member)         \
    for (pos = list_entry(pos->member.next, typeof(*pos), member),       \
        n = list_entry(pos->member.next, typeof(*pos), member);      \
         &pos->member != (head);                     \
         pos = n, n = list_entry(n->member.next, typeof(*n), member))
 
/**
 * list_for_each_entry_safe_from - iterate over list from current point safe against removal
 * @pos:    the type * to use as a loop cursor.
 * @n:      another type * to use as temporary storage
 * @head:   the head for your list.
 * @member: the name of the list_struct within the struct.
 *
 * Iterate over list of given type from current point, safe against
 * removal of list entry.
 */
#define list_for_each_entry_safe_from(pos, n, head, member)             \
    for (n = list_entry(pos->member.next, typeof(*pos), member);     \
         &pos->member != (head);                     \
         pos = n, n = list_entry(n->member.next, typeof(*n), member))
 
/**
 * list_for_each_entry_safe_reverse - iterate backwards over list safe against removal
 * @pos:    the type * to use as a loop cursor.
 * @n:      another type * to use as temporary storage
 * @head:   the head for your list.
 * @member: the name of the list_struct within the struct.
 *
 * Iterate backwards over list of given type, safe against removal
 * of list entry.
 */
#define list_for_each_entry_safe_reverse(pos, n, head, member)      \
    for (pos = list_entry((head)->prev, typeof(*pos), member),   \
        n = list_entry(pos->member.prev, typeof(*pos), member);  \
         &pos->member != (head);                     \
         pos = n, n = list_entry(n->member.prev, typeof(*n), member))
 
/**
 * list_safe_reset_next - reset a stale list_for_each_entry_safe loop
 * @pos:    the loop cursor used in the list_for_each_entry_safe loop
 * @n:      temporary storage used in list_for_each_entry_safe
 * @member: the name of the list_struct within the struct.
 *
 * list_safe_reset_next is not safe to use in general if the list may be
 * modified concurrently (eg. the lock is dropped in the loop body). An
 * exception to this is if the cursor element (pos) is pinned in the list,
 * and list_safe_reset_next is called after re-taking the lock and before
 * completing the current iteration of the loop body.
 */
#define list_safe_reset_next(pos, n, member)                \
    n = list_entry(pos->member.next, typeof(*pos), member)
 
/*
 * Double linked lists with a single pointer list head.
 * Mostly useful for hash tables where the two pointer list head is
 * too wasteful.
 * You lose the ability to access the tail in O(1).
 */
 
#define HLIST_HEAD_INIT { .first = NULL }
#define HLIST_HEAD(name) struct hlist_head name = {  .first = NULL }
#define INIT_HLIST_HEAD(ptr) ((ptr)->first = NULL)
static inline void INIT_HLIST_NODE(struct hlist_node *h)
{
    h->next = NULL;
    h->pprev = NULL;
}
 
static inline int hlist_unhashed(const struct hlist_node *h)
{
    return !h->pprev;
}
 
static inline int hlist_empty(const struct hlist_head *h)
{
    return !h->first;
}
 
static inline void __hlist_del(struct hlist_node *n)
{
    struct hlist_node *next = n->next;
    struct hlist_node **pprev = n->pprev;
    *pprev = next;
    if (next)
        next->pprev = pprev;
}
 
static inline void hlist_del(struct hlist_node *n)
{
    __hlist_del(n);
    n->next = LIST_POISON1;
    n->pprev = LIST_POISON2;
}
 
static inline void hlist_del_init(struct hlist_node *n)
{
    if (!hlist_unhashed(n)) {
        __hlist_del(n);
        INIT_HLIST_NODE(n);
    }
}
 
static inline void hlist_add_head(struct hlist_node *n, struct hlist_head *h)
{
    struct hlist_node *first = h->first;
    n->next = first;
    if (first)
        first->pprev = &n->next;
    h->first = n;
    n->pprev = &h->first;
}
 
/* next must be != NULL */
static inline void hlist_add_before(struct hlist_node *n,
                    struct hlist_node *next)
{
    n->pprev = next->pprev;
    n->next = next;
    next->pprev = &n->next;
    *(n->pprev) = n;
}
 
static inline void hlist_add_after(struct hlist_node *n,
                    struct hlist_node *next)
{
    next->next = n->next;
    n->next = next;
    next->pprev = &n->next;
 
    if(next->next)
        next->next->pprev  = &next->next;
}
 
/* after that we'll appear to be on some hlist and hlist_del will work */
static inline void hlist_add_fake(struct hlist_node *n)
{
    n->pprev = &n->next;
}
 
/*
 * Move a list from one list head to another. Fixup the pprev
 * reference of the first entry if it exists.
 */
static inline void hlist_move_list(struct hlist_head *old,
                   struct hlist_head *new)
{
    new->first = old->first;
    if (new->first)
        new->first->pprev = &new->first;
    old->first = NULL;
}
 
#define hlist_entry(ptr, type, member) container_of(ptr,type,member)
 
#define hlist_for_each(pos, head) \
    for (pos = (head)->first; pos ; pos = pos->next)
 
#define hlist_for_each_safe(pos, n, head) \
    for (pos = (head)->first; pos && ({ n = pos->next; 1; }); \
         pos = n)
 
/**
 * hlist_for_each_entry - iterate over list of given type
 * @tpos:   the type * to use as a loop cursor.
 * @pos:    the &struct hlist_node to use as a loop cursor.
 * @head:   the head for your list.
 * @member: the name of the hlist_node within the struct.
 */
#define hlist_for_each_entry(tpos, pos, head, member)            \
    for (pos = (head)->first;                     \
         pos &&                          \
        ({ tpos = hlist_entry(pos, typeof(*tpos), member); 1;}); \
         pos = pos->next)
 
/**
 * hlist_for_each_entry_continue - iterate over a hlist continuing after current point
 * @tpos:   the type * to use as a loop cursor.
 * @pos:    the &struct hlist_node to use as a loop cursor.
 * @member: the name of the hlist_node within the struct.
 */
#define hlist_for_each_entry_continue(tpos, pos, member)         \
    for (pos = (pos)->next;                       \
         pos &&                          \
        ({ tpos = hlist_entry(pos, typeof(*tpos), member); 1;}); \
         pos = pos->next)
 
/**
 * hlist_for_each_entry_from - iterate over a hlist continuing from current point
 * @tpos:   the type * to use as a loop cursor.
 * @pos:    the &struct hlist_node to use as a loop cursor.
 * @member: the name of the hlist_node within the struct.
 */
#define hlist_for_each_entry_from(tpos, pos, member)             \
    for (; pos &&                            \
        ({ tpos = hlist_entry(pos, typeof(*tpos), member); 1;}); \
         pos = pos->next)
 
/**
 * hlist_for_each_entry_safe - iterate over list of given type safe against removal of list entry
 * @tpos:   the type * to use as a loop cursor.
 * @pos:    the &struct hlist_node to use as a loop cursor.
 * @n:      another &struct hlist_node to use as temporary storage
 * @head:   the head for your list.
 * @member: the name of the hlist_node within the struct.
 */
#define hlist_for_each_entry_safe(tpos, pos, n, head, member)        \
    for (pos = (head)->first;                     \
         pos && ({ n = pos->next; 1; }) &&                \
        ({ tpos = hlist_entry(pos, typeof(*tpos), member); 1;}); \
         pos = n)

허걱... 무려 721라인이나 되는군요..@_@;

사실 너무나 많은 소스파일 때문에 겁부터 먹으셨는지 모르겠습니다.. 

저도 다 분석하려 생각하니 눈앞이 깜깜해지는 군요..ㅎㄷㄷ

하지만 모든 코드를 분석하는 것이 아니라 우리가 알고 있는 자료구조가 어떻게 쓰였는가에 대해 알아볼 참이기 때문에 핵심만 간단하게 간추려서 보도록 하겠습니다.


우선 각 함수들의 이름과 목적을 간추려 보도록 하죠.

간단하게 구분하기 위해서 매크로함수는 붉은색으로 static inline함수는 원형으로 표시하도록 하겠습니다. 


※ static inline은 매크로함수로 컴파일 되기 전 시점에 함수를 호출하는 함수가 자동으로 코드로 치환되어 집니다. 그러므로 일반함수의 메커니즘에 비해 상대적으로 빠르다고 할 수 있습니다. 일반함수는 함수의 프로토타입만을 기억하고 있다가 함수 호출시 메모리를 참조하는 방식입니다.


LIST_HEAD_INIT(name)

LIST_HEAD(name)

static inline void INIT_LIST_HEAD(struct list_head *list)

static inline void list_add(struct list_head *new, struct list_head *head)

static inline void list_add_tail(struct list_head *new, struct list_head *head)

static inline void __list_del(struct list_head * prev, struct list_head * next)

static inline void list_replace(struct list_head *old, struct list_head *new)

static inline void list_replace_init(struct list_head *old, struct list_head *new)

static inline void list_del_init(struct list_head *entry)

static inline void list_move(struct list_head *list, struct list_head *head)

static inline void list_move_tail(struct list_head *list, struct list_head *head)

static inline int list_is_last(const struct list_head *list, const struct list_head *head)

static inline int list_empty(const struct list_head *head)

static inline int list_empty_careful(const struct list_head *head)

static inline void list_rotate_left(struct list_head *head)

static inline int list_is_singular(const struct list_head *head)

static inline void __list_cut_position(struct list_head *list, struct list_head *head, struct list_head *entry)

static inline void list_cut_position(struct list_head *list, struct list_head *head, struct list_head *entry)

static inline void __list_splice(const struct list_head *list, struct list_head *prev, struct list_head *next)

static inline void list_splice(const struct list_head *list, struct list_head *head)

static inline void list_splice_tail(struct list_head *list, struct list_head *head)

static inline void list_splice_init(struct list_head *list, struct list_head *head)

static inline void list_splice_tail_init(struct list_head *list, struct list_head *head)

list_entry(ptr, type, member)

list_first_entry(ptr, type, member)

list_for_each(pos, head)

__list_for_each(pos, head)

list_for_each_prev(pos, head)

list_for_each_safe(pos, n, head)

list_for_each_prev_safe(pos, n, head)

list_for_each_entry(pos, head, member)

list_for_each_entry_reverse(pos, head, member)

list_prepare_entry(pos, head, member)

list_for_each_entry_continue(pos, head, member)

list_for_each_entry_continue_reverse(pos, head, member)

list_for_each_entry_from(pos, head, member)

list_for_each_entry_safe(pos, n, head, member)

list_for_each_entry_safe_continue(pos, n, head, member)

list_for_each_entry_safe_from(pos, n, head, member)

list_for_each_entry_safe_reverse(pos, n, head, member)

list_safe_reset_next(pos, n, member)

HLIST_HEAD_INIT

HLIST_HEAD(name)

INIT_HLIST_HEAD(ptr)

static inline void INIT_HLIST_NODE(struct hlist_node *h)

static inline int hlist_unhashed(const struct hlist_node *h)

static inline int hlist_empty(const struct hlist_head *h)

static inline void __hlist_del(struct hlist_node *n)

static inline void hlist_del(struct hlist_node *n)

static inline void hlist_del_init(struct hlist_node *n)

static inline void hlist_add_head(struct hlist_node *n, struct hlist_head *h)

static inline void hlist_add_before(struct hlist_node *n, struct hlist_node *next)

static inline void hlist_add_after(struct hlist_node *n, struct hlist_node *next)

static inline void hlist_add_fake(struct hlist_node *n)

static inline void hlist_move_list(struct hlist_head *old, struct hlist_head *new)

hlist_entry(ptr, type, member)

hlist_for_each(pos, head)

hlist_for_each_safe(pos, n, head)

hlist_for_each_entry(tpos, pos, head, member)

hlist_for_each_entry_continue(tpos, pos, member)

hlist_for_each_entry_from(tpos, pos, member)

hlist_for_each_entry_safe(tpos, pos, n, head, member)


 일단 위의 소스 중 prev와 next를 보아하니 linux_kernel에서는 이중 연결리스트가 사용되고 있음을 알 수가 있습니다.

사실 이쯤되면 이중연결리스트에 왜 이렇게 많은 코드가 쓰였을까하는 의문이 드실 수 있습니다. 만약 의문이 드신 분이 있다면 뛰어난 통찰력을 가졌다고 감히 말씀드리겠습니다.ㅎㅎ


 위의 소스는 기본인 개념이 중복되는 코드가 많으며 각 특수한 목적에 맞게 자료구조를 각 상황에 알맞게 튜닝하였기에 코드가 불어난 것이죠. 잘 보시면 복잡한 위의 코드도 기본적인 뼈대는 아래와 같습니다.


코드는 linux-3.3.3\linux-3.3.3\tools\firewire\list.h를 참조하였습니다.
1
2
3
4
5
6
7
8
9
10
11
12
13
14
15
16
17
18
19
20
21
22
23
24
25
26
27
28
29
30
31
32
33
34
35
36
37
38
39
40
41
42
43
44
45
46
47
48
49
50
51
52
53
54
55
56
57
58
59
60
61
struct list {
    struct list *next, *prev;
};
 
static inline void
list_init(struct list *list)
{
    list->next = list;
    list->prev = list;
}
 
static inline int
list_empty(struct list *list)
{
    return list->next == list;
}
 
static inline void
list_insert(struct list *link, struct list *new_link)
{
    new_link->prev       = link->prev;
    new_link->next       = link;
    new_link->prev->next  = new_link;
    new_link->next->prev  = new_link;
}
 
static inline void
list_append(struct list *list, struct list *new_link)
{
    list_insert((struct list *)list, new_link);
}
 
static inline void
list_prepend(struct list *list, struct list *new_link)
{
    list_insert(list->next, new_link);
}
 
static inline void
list_remove(struct list *link)
{
    link->prev->next = link->next;
    link->next->prev = link->prev;
}
 
#define list_entry(link, type, member) \
    ((type *)((char *)(link)-(unsigned long)(&((type *)0)->member)))
 
#define list_head(list, type, member)       \
    list_entry((list)->next, type, member)
 
#define list_tail(list, type, member)       \
    list_entry((list)->prev, type, member)
 
#define list_next(elm, member)                  \
    list_entry((elm)->member.next, typeof(*elm), member)
 
#define list_for_each_entry(pos, list, member)          \
    for (pos = list_head(list, typeof(*pos), member);   \
         &pos->member != (list);             \
         pos = list_next(pos, member))


무언가 확~ 줄은 느낌이죠? 우리는 오늘 리눅스 커널에서 자료구조를 이해하기 위해 커널을 보는 것이니 살살 접근하도록 하겠습니다. ㅎㅎ 처음부터 빡시게하면 힘들어져요^^;


일단 위의 코드에서 나오는 이중 연결리스트에 대한 기본적인 설명은 학과과정 중 기본에 속하는 내용이므로 자세한 설명은 패스하도록 하겠습니다. 그림으로 보자면 아래와 같겠지요. 먼가 복잡하게 보일지 모르겠지만 그냥 앞과 뒤가 순차적으로 연결되어 있는 리스트라고 생각하시면 됩니다.


 지금부터 위의 리눅스 커널 소스을 가지고 샘플코드를 구현하면서 설명을 할 참입니다. Step by Step으로 넘어갈테니 천천히 잘 따라오시기 바랍니다. 우선 Linked list에 대해 잘 숙지하고 계셔야 이해가 가실거라는걸 미리 말씀드립니다. 이래서 흔히 부모님이 뭐든 기본이 중요하다는 애기를 입이 닳도록 했었나 봅니다. ㅎㅎ

아무튼 아래는 마지막에 소개드린 list.h를 가지고 구현한 간단한 샘플코드 입니다.


※ 참고로 윈도우 환경에서 테스트를 하였습니다. typeof() 연산자가 visual C 컴파일시 문제가 되었는데요. 때문에 샘플에서는 C표준이 아닌 gcc에서 확장으로 지원하는 typeof() 연산자 대신 같은 의미를 가지는 임의의 구조체 타입으로 치환하였다는 것을 미리 말씀드립니다.

1
2
3
4
5
6
7
8
9
10
11
12
13
14
15
16
17
18
19
20
21
22
23
24
25
26
27
28
29
30
31
32
33
34
35
36
37
38
39
40
41
42
43
44
45
46
47
48
49
50
51
52
53
54
55
56
57
58
59
60
61
62
63
64
65
66
67
68
69
70
71
72
73
74
75
76
77
78
79
80
81
82
83
84
85
86
87
88
89
90
91
92
93
94
95
96
97
98
99
100
101
102
103
104
105
106
107
108
109
110
111
112
113
114
#include <stdio.h>
#include <stdlib.h>
#include <string.h>
 
typedef struct list {
    struct list *next, *prev;
}NODE;
 
typedef struct star
{
    char name[10];
    int vote;
    NODE list;
}STAR;
 
static inline void
list_init(struct list *list)
{
    list->next = list;
    list->prev = list;
}
 
static inline int
list_empty(struct list *list)
{
    return list->next == list;
}
 
static inline void
list_insert(struct list *link, struct list *new_link)
{
    new_link->prev       = link->prev;
    new_link->next       = link;
    new_link->prev->next  = new_link;
    new_link->next->prev  = new_link;
}
 
static inline void
list_append(struct list *list, struct list *new_link)
{
    list_insert((struct list *)list, new_link);
}
 
static inline void
list_prepend(struct list *list, struct list *new_link)
{
    list_insert(list->next, new_link);
}
 
static inline void
list_remove(struct list *link)
{
    link->prev->next = link->next;
    link->next->prev = link->prev;
}
 
#define list_entry(link, type, member) \
    ((type *)((char *)(link)-(unsigned long)(&((type *)0)->member)))
 
#define list_head(list, type, member)       \
    list_entry((list)->next, type, member)
 
#define list_tail(list, type, member)       \
    list_entry((list)->prev, type, member)
 
#define list_next(elm, member)                  \
    list_entry((elm)->member.next, STAR, member)
 
#define list_for_each_entry(pos, list, member)\
for (pos = list_head(list, STAR, member);\
         &pos->member != (list);\
         pos = list_next(pos, member))
 
 
void display(NODE *head)
{
    STAR *p;
    system("cls");
    printf("[head]<->");
     
    list_for_each_entry( p, head, list )
    {      
        printf("[%s,%d]<->", p->name, p->vote );
    }
    getchar();
}
 
int main(void)
{  
    int i;
    NODE head;
 
    // 리스트 헤드 초기화
    list_init(&head);
         
    char *p[] = {"지나","신민아","아이유","현아","이민정"};
 
    STAR *temp;
     
    display(&head);
 
    for(i=0; i<5; i++ )
    {
        temp = (STAR*)malloc( sizeof(STAR) );
        strcpy( temp->name, p[i]);
        temp->vote = (i+1)*10;
 
        list_append( &head, &temp->list );
        display(&head);
    }
 
    return 0;
}
<p></p>


일단 실행부터 시켜보면 아래와 같이 엔터를 누를때마다 리스트에 연예인 이름이 추가되는 것을 볼 수 있습니다. 후후후 제가 좋아하는 연예인리스트죠.. =_=


그런데 학과시절 자료구조를 통해서만 책을 봐오신 분들은 어떻게 이 연결리스트가 어떻게 화면에 출력 될 수 있지? 하는 의구심이 들수도 있습니다. 저도 처음엔 그랬으니깐요. ㅎㅎ 함수들을 살펴보니 삽입, 삭제등의 함수는 보이지만 각 리스트들에게 접근하는 함수는 보이지가 않으니 말이죠. 대신 이상한 메크로들만 보일뿐이니, list_entry등과 같은 매크로 함수가 바로 그 것 입니다.


그럼 의문점은 잠시 뒤로하고 어떻게 리스트가 구성되었는지 부터 따라가도록 하겟습니다.

다 아시는 내용이겠지만 main함수에서는 리스트의 헤드를 초기화하고 비어있는 리스트를 화면에 디스플레이 해 준 다음, for문에서 리스트에 5번의 삽입과 화면에 출력이 수행됩니다. 삽입 과정을 그림으로 표현하자면 아래와 같습니다.


① list_init(&head);  // 헤더 초기화


② temp = (STAR*)malloc( sizeof(STAR) );
strcpy( temp->name, p[i]);
temp->vote = (i+1)*10;

list_append( &head, &temp->list );  // 리스트에 new node 삽입


③ temp = (STAR*)malloc( sizeof(STAR) );
strcpy( temp->name, p[i]);
temp->vote = (i+1)*10;

list_append( &head, &temp->list );  // 리스트에 new node 삽입


④ 계속 반복적인 작업의 결과 아래와 같은 리스트가 만들어집니다.


 루프안에서 삽입 후 바로 출력이 일어납니다. 출력은 void display(NODE *head) 함수에서 수행되는데 여기서 주의깊게 보아야 할 부분은 아래 매크로입니다. 일단  list_for_each_entry라는 매크로 함수에 대해 설명하기에 앞서 이 매크로의 목적은 "리스트의 노드들을 한바퀴 순환하면서, 각 노드들을 참조하는 포인터를 시작주소 지점(entry)으로 옮기는 것" 입니다. 뭔소린지는 몰라도 일단 넘어가도록 하죠.ㅎㅎ


#define list_for_each_entry(pos, list, member)\
for (pos = list_head(list, STAR, member);\
      &pos->member != (list);\
      pos = list_next(pos, member))


흠.. 코드를 보고 있자니 이게 먼 소리인가 싶을 겁니다. 먼가 복잡해 보이지만 실제로 한줄 한줄 읽어보면 별거 없습니다.
일단 매크로 함수에서 매개변수로 쓰인 넘들이 뭐하는 넘들인지부터 살펴보죠.. 이자식들 다 주것써..ㅡㅡ


① pos : 리스트의 현재 위치를 저장할 position. 타입(Type)은 리스트의 구조체를 가리키는 포인터야함!

뇬석은 배열의 인덱스와 같은 넘이죠.

② list : next, prev를 member로 가지는 구조체의 포인터! 이 예제에서는 헤더!

③ member : 리스트의 구조체에서 pre와 next를 가지고 있는 구조체 변수명! (Type은 ②번의 'list')


위의 멤버들을 그림으로 보자면 아래와 같겠군요.


매개변수가 뭐하는 넘들인지 정체가 탄로났으니 이제 반복문을 살펴보겠습니다.


for문의 기화 구문 

pos = list_head(list, STAR, member) → 리스트의 헤더로 position을 초기화 하겠음!


for문의 조  구문

&pos->member != (list) → pos의 member라 함은 현재 pos가 가르키는 리스트 객체에서 next, prev를 멤버로 가지는 struct list 구조체를 말합니다. 그렇다면 pos->member의 주소와 list를 != 조건비교하는 것은 무슨 의미일까요? list는 아까 헤더(head)라는 것을 기억하셔야 할 겁니다. 즉 pos가 리스트의 객체를 한놈 한놈 가르키고 난뒤 한바퀴 다 돌아서 다시 헤더(head)로 오게 되는 상황이 오게 되겠죠. 이때 조건이 성립하지 않게 되면서 루프를 탈출하게 되는 것이죠.


for문의  감 구문

pos = list_next(pos, member) → 매크로 함수명 그대로 다음 리스트 객체를 가르키는 겁니다. ㅎㅎㅎ 쉽죠.


반복문을 살펴봤으니 반복문 속에 있는 매크로 함수로 더 깊게 파고들어 보겠습니다. 두두두두~

지금 살펴볼 매크로 함수는 list_head(list, STAR, member)와 list_next(pos, member) 함수 입니다. 이 두 함수의 속을 들여다 보면 똑같은 함수를 호출하고 있음을 알 수 있습니다. 바로 아래와 같은 넘이죠.


#define list_entry(link, type, member) \
 ((type *)((char *)(link)-(unsigned long)(&((type *)0)->member)))


헉... 이건머지? 하는 분들이 많으실 거라 생각합니다. 참으로 난감한 녀석이죠. 어떤 녀석이길래 이렇게 많은 변신(type casting)을 하는 것인지 궁금해지기 시작했습니다. 사실 이 코드의 역할은 간단합니다. 해당하는 리스트 객체의 시작주소를 얻어내는 것이죠. 기차처럼 연결된 리스트에서 각 리스트 객체의 시작주소를 안다는 것은 모든 멤버로의 접근이 가능하다는 것입니다. 사실 위에서 연예인들의 이름으로 구성된 이중연결리스트는 아까 확인한 바 있습니다. 


여기서 Offset 이라는 넘이 list_entry(link, type, member) 함수의 키워드 열쇠입니다. 리스트는 다음 노드의 next, prev를 담고 있는 struct list의 시작주소(link address)를 참조하고 있습니다. 여기서 각 노드의 연예인 이름들을 출력하려면 이 주소에서 offset에 해당하는 크기의 값을 빼주어야 연예인이름을 출력할 수 있습니다. 즉 Struct star라는 노드의 시작주소로 접근해야 모든 값에 접근할 수 있는 셈인거죠. 간단하게 매크로 함수를 풀어보면 아래와 같습니다.


먼저 뺄셈 연산의 뒷부분부터 보도록 하겠습니다. 0을 (type*)로 캐스팅하여 사용자로 부터 전달받을 member의 주소를 (unsigned long)으로 캐스팅하고 있습니다. 왜 이렇게 코드를 작성했을까하는 의문이 들 수도 있는데, 이는 많은 사람들이 모든 리스트에서 공용으로 사용할 수 있는 매크로 함수로 만들어야 하기에 이와 같은 예술적인 코드가 나오게 된거라고 말씀드리겠습니다. 그럼 0에 대한 가상 구조체에 대한 의문이 풀렸다고 쳤지만, 앞의 캐스팅은 왜 해야되는지 의문이 들 수 있습니다. "(unsigned long)(&((type *)0)->member))" 는 단순히 offset으로 구하는 것이기 때문에 음수가 나올 수 없겠죠? 그렇기때문에 unsigned long으로 캐스팅하는 것 입니다. 


 다음은 뺄셈 연산의 앞부분을 살펴보도록 하겠습니다. link address가 int* 타입일때 임의의 숫자 4를 빼버리면 실제로 빼지는 값은 16이 빠져버립니다.(포인터 연산) 그래서 1byte씩 포인터연산을 하기 위하여 char*로 Type casting하는 것 입니다. 마지막으로 연산된 주소 값은 사용자가 정의한 Type의 Struct를 가르켜야 하기 때문에 Type*로 캐스팅하고 있습니다. 이 모든것이 start 구조체의 시작주소를 얻기 위함임을 다시한번 알려드립니다. 시작주소를 얻는다는 것은 모든 매개변수에 접근할 수 있다는 것도 잊지마세요.


※ list_entry을 언급하면서 offsetof라는 함수에 대해 말씀드리려 하는데, offsetof라는 함수는 <stddef.h>에서 표준으로 제공하고 있으며, 구조체의 멤버변수가 구조체상의 배치되어 있는 offset을 알려줍니다. 참고하세요.


그렇다면 다시 list_for_each_entry 함수로 돌아와서 이야기를 진행해보겠습니다. 이 함수의 목적은 아까 설명을 하기에 앞서 "리스트의 노드들을 한바퀴 순환하면서, 각 노드들을 참조하는 포인터를 시작주소 지점(entry)으로 옮기는 것"이라고 설명했는데 이제 이해가 가시는 가요? 결론 짓자면 샘플 프로그램에서 이 함수의 목적은 출력이라고 할 수 있습니다.


실제로 이렇게 커널에서 자료구조가 활용되고 있음을 알 수가 있습니다. 테스크 리스트, 소켓버퍼 리스트, 프로세스 리스트 등등 많은 부분에서 이 자료구조를 활용한다고 하는데 시간이 나면 실제로 활용되고 있는 부분을 분석해서 공유하도록 하겠습니다. 


출처 : http://golee07.tistory.com/

//
프로그래밍/C 2013. 4. 19. 00:09

포인터는 변수이다. 포인터는 메모리 번지를 저장하는 변수이다. 다음 정의에서


  int   i;

  int* pi;


는 모두 변수이다. 차이점이 있다면 i는 값을 저장하기 위한 변수이고, pi는 메모리 번지를 저장하기 위한 변수이다.


i 및 pi가 차지하는 메모리 공간은 4바이트이다. 그렇다면 두 변수는 서로 성질은 틀리지만 값을 교환할 수 있다.

다음은 i 및 pi의 사용이다.


  int   i;

  int* pi;

  i = 50;

  pi = &i;          // 변수 pi에 i의 번지값을 대입

  pi = (int*)i;    // 변수 pi에 i의 값을 대입


위 코드에서 pi는 i의 번지가 아닌 i의 값을 갖게 된다.


  int   i;

  int* pi;

  i = 50; 

  pi = (int*)i;    // 변수 pi에 i의 값을 대입, pi는 i의 값 50을 메모리 번지로 대입 받는다.

  printf( "%d ", pi );   // 50이 출력, 변수 pi의 값을 출력하기 때문에

  *pi = 30;      // pi는 i의 값 50을 갖고 있으므로, *pi는 50번지를 접근하게 된다.

                            // 메모리 번지 50번지는 일반적으로 접근할 수 없는 번지이니까 프로그램 다운된다.

                            // 만약 i가 50이 아니라 특정 변수의 주소값이었다면, 그 특정 변수에 접근은 가능할

                            // 것이다.


결국 존재하지 않는 임의의 번지를 위와 같이 pi에 넣을 수는 있지만, 옳지 않은 번지를 접근함으로써 프로그램은

다운된다. 그렇기 때문에 C 언어는 이를 다음과 같이 직접 대입할 경우 경고 에러(Warning Error)를 발생시킨다.


   pi = i;      // warning C4047: '=' : 'int *' differs in levels of indirection from 'int '


정리하면, 포인터 변수와 일반 데이터 변수간에는 그 값을 맞교환할 수 있지만, 그 사용에 있어서는 주의를 해야 한다.

다음 코드는 어떨까? 내가 나의 번지를 갖고 있다가 나한테 접근해서 값을 바꾼다.


  int  i = 5;

  i = (int)&i;      // i에 i의 번지를 대입
  printf( "i의 주소는 %#X \n", i );   // i의 주소는 0X12FF7C

  *(int*)i = 100;
  printf( "i의 값은 %d \n", i );
          
// i의 값은 100


다음 코드는 함수 포인터를 대신해서 사용되는 i 변수이다. 변수 i는 4바이트 크기를 갖기 때문에 함수 포인터로 동작할

수 있다.


  #include <stdio.h>

  int count = 0;

  void main( void 
  {
      int  i;

      i  =  (int)main;

      printf( "%d ", count++ );

      ( (void(*)(void)) i ) ();   // main() 함수를 직접 호출하는 것과 동일

                                                          // i를 함수 포인터로 먼저 캐스팅한 후 함수화
  

}


출처 : http://blog.naver.com/PostList.nhn?blogId=eunchol71

'프로그래밍 > C' 카테고리의 다른 글

Vi 편집기 setting  (0) 2013.04.19
linux kernel에서 쓰이는 자료구조.(double linked list and tree)  (0) 2013.04.19
Double linked list with using array  (0) 2013.04.19
함수 포인터  (0) 2013.04.19
linked list [펌]  (0) 2013.04.19
//
프로그래밍/C 2013. 4. 19. 00:08

이중 링크드 리스트를 사용할 때 장점과 단점은 다음과 같다.


장점은,

  1. 데이터의 삽입, 삭제가 빠르다.


단점은,

  1. 데이터의 추가 시 메모리 할당이 발생하고, 삭제 시 메모리 해제가 발생한다.

  2. 메모리 조각이 많이 발생한다.

  3. 항상 처음부터 검색해야 한다.


이 중 단점 1,2를 배열을 사용해서 해결할 수 있다. 배열을 이용하면 메모리의 할당 및 해제가 자주 발생하지

않기 때문에 메모리 단편화를 줄일 수 있어, 효율적인 프로그램을 개발할 수 있다. 또한 메모리를 할당할 때

마다 발생하는 페이지 할당이 줄기 때문에 적은 메모리를 사용하게 된다. 이제는 링크드 리스트를 사용할 때

아래의 코드와 같이 배열을 사용하여 만들어 보자.


다음은 소스 코드이다.


#include <stdio.h>         // printf, scanf
#include <stdlib.h>        // malloc
#include <malloc.h>      // malloc
#include <memory.h>     // memset


struct tag_node
{
    int data;                        // data
    struct tag_node* next;     // 4바이트 구조체 포인터
    struct tag_node* prev;     // 4바이트 구조체 포인터
};


typedef struct tag_node  NODE;
typedef struct tag_node* PNODE;


struct tag_block
{
    struct tag_block* block;
    struct tag_block* next;
};


typedef struct tag_block  BLOCK;
typedef struct tag_block* PBLOCK;


const int block_size = 100;    // 배열의 크기


PNODE NewNode( PNODE prev, PNODE next );
void AddTail( int data );
void AddHead( int data );
int  RemoveNode( PNODE pnode );

void PRINT();
void FREE();


PNODE  HeadNode = NULL, TailNode = NULL, FreeNode = NULL;
PBLOCK NodeBlock = NULL;


void main( void )
{
    int data = 1;
    
    while( data )
    {
        scanf( "%d"&data );
        AddTail( data );
    }

    PRINT();
    FREE();
}


PNODE NewNode( PNODE PrevNode, PNODE NextNode )
{
    PNODE Node;

    if( !FreeNode )
    {
        int i;
        PNODE pnode;    // 1차원 배열의 포인터
        PBLOCK pblock;

        // BLOCK + block_size 만큼 1차원 배열을 할당
        // 메모리 구조는 다음과 같이 한 개의 BLOCK 구조체와
        // 여러 개의 NODE 구조체로 구성된다.
        // |  BLOCK(8바이트)  | NODE * block_size |
        pblock = (PBLOCK)mallocsizeof(BLOCK) + sizeof(NODE) * block_size );
        
        // BLOCK의 첫 8바이트를 가지고 NODE 블럭을 관리한다.
        if( !NodeBlock )
        {
            NodeBlock = pblock;
            NodeBlock->block = pblock;
            NodeBlock->next  = NULL;
        }
        else
        {
            pblock->next = NodeBlock;
            NodeBlock = pblock;
            NodeBlock->block = pblock;
        }


        // FreeNode를 BLOCK의 크기인 8만큼 더한 위치로 설정
        FreeNode = (PNODE)(pblock + 1);

        memset( FreeNode, 0, sizeof(NODE) * block_size );
        pnode = FreeNode;


        // 각 배열 요소의 next를 그 다음 배열 요소로 설정
        // 맨 끝의 배열 요소는 memset 함수에 의해 자동으로 NULL이 됨
        for( i=0; i<block_size-1; i++ )
        {
            pnode[i].next = &pnode[i+1];
        }
    }


    Node = FreeNode;
    FreeNode = FreeNode->next;     // 다음 Node로 이동


    Node->prev = PrevNode;         // 이전 노드 설정
    Node->next = NextNode;         // 다음 노드 설정


    return Node;
}


void AddTail( int data )
{
    PNODE pnode;


    pnode = NewNode( TailNode, NULL );
    pnode->data = data;


    if( !HeadNode )
    {
        HeadNode = TailNode = pnode;
        return;
    }


    TailNode->next = pnode;
    pnode->prev = TailNode;
    TailNode = pnode;
}


void AddHead( int data )
{
    PNODE pnode;


    pnode = NewNode( TailNode, NULL );
    pnode->data = data;


    if( !HeadNode )
    {
        HeadNode = TailNode = pnode;
        return;
    }


    HeadNode->prev = pnode;
    pnode->next = HeadNode;
    HeadNode = pnode;
}


int RemoveNode( PNODE pnode )
{
    PNODE PrevNode;
    PNODE NextNode;


    PrevNode = pnode->prev;
    NextNode = pnode->next;


    // 제거되는 노드가 HeadNode인 경우
    if( pnode == HeadNode )
    {
        HeadNode = HeadNode->next;
    }


    // 제거되는 노드가 TailNode인 경우
    if( pnode == TailNode )
    {
        TailNode = TailNode->prev;
    }


    // 제거되는 노드의 이전 노드가 있는 경우
    if( PrevNode )
    {
        PrevNode->next = NextNode;
    }


    // 제거되는 노드의 다음 노드가 있는 경우
    if( NextNode )
    {
        NextNode->prev = PrevNode;
    }


    // FreeNode의 맨 앞으로 연결
    pnode->next = FreeNode;
    FreeNode = pnode;


    return pnode->data;
}


void PRINT()
{
    PNODE pnode = HeadNode;         // 맨 앞의 링크드 리스트 위치로 설정

    while( pnode )
    {
        printf( "%d ", pnode->data );
        pnode = pnode->next;            // 다음 리스트의 번지값으로 pnode의 값을 변경
    }
}


void FREE()
{
    PBLOCK pblock;
    pblock = NodeBlock;

    while( pblock )
    {
        NodeBlock = pblock->next;
        free( pblock );
        pblock = NodeBlock;
    }
}


위 코드에서 NewNode()라는 함수는 아래의 그림과 같이 BLOCK 구조체와 NODE 구조체를 생성하는 함수이다.

이 함수는 내부적으로 malloc() 함수에 의해 BLOCK 구조체 한 개, NODE 구조체 100개를 생성한다.


NODE가 위와 같이 한 번에 100개(또는 1000개도 가능) 생성되면, 100개의 NODE를 다 사용할 때까지

더는 메모리 할당이 발생하지 않는다. 이 것은 메모리 단편화를 없앨 수 있는 방법이기도 하다. 만약

NODE를 필요할 때마다 할당한다면 무수히 많은 메모리 조각이 생길 것이고, 결국 작은 메모리 조각을

할당하고 관리하기 위해 좀 더 많은 메모리가 필요해 진다.


출처 : http://blog.naver.com/PostList.nhn?blogId=eunchol71

'프로그래밍 > C' 카테고리의 다른 글

linux kernel에서 쓰이는 자료구조.(double linked list and tree)  (0) 2013.04.19
포인터? 포인터변수? 포인터의 이해  (0) 2013.04.19
함수 포인터  (0) 2013.04.19
linked list [펌]  (0) 2013.04.19
Double linked list  (0) 2013.04.19
//